User Tools
Table of Contents
1. PLM Basics
1.1 What is Product Lifecycle Management concerned with?
Integrated concept for the IT-supported organization of product data and information.
- All information about your products is always available at the relevant points in the company.
- The diverse information needs are integrated and satisfied.
Knowledge is stored and reused for successor products and product innovations.
- By creating transparency, master the complexity of your products; - accelerate “time to market”.

1.2 Product Lifecycle Management - Two core processes in the company

1.3 What is a PLM system?
A PLM system is a tool for administration:
- of the processes
- of the applications
- and the required information for the
- Construct
- Manufacture
- Support
- The product during its life cycle
The advantage of such a tool is the creation of a single common interface.
- to the administration
- to access
all data within an organization.
1.4 Advantages of using a PLM system
The following advantages result from the use of a PLM system:
- Reduction of multiple data
- Easy retrieval and distribution of data
- Quick and easy display of models
- Particularly useful for checking changes
- Revision control ensures working with the most up-to-date data
- Management of assemblies and relationships between components
- Easy creation of modifications of parts lists
- Storage of the entire product history
- Establishes relationships between parts, including requirements and specification
- Provides access control and auditing to ensure data integrity
2. Basics Teamcenter
2.1 User Interface
Teamcenter Rich Client provides a product interface with a rich feature set that includes product management capabilities and application management configurability in one platform. The complexity and robustness of the features available make this interface more suitable for advanced users and application administrators.
The rich client interface has a standard menu bar and toolbar with options that can include different elements depending on the active application perspective. Position the cursor on a rich client toolbar button to display a tooltip description.

| 1 | The Back and Forward buttons | You can use the Back and Forward buttons to switch between open Teamcenter applications. The small arrows next to the buttons allow you to select from the list of currently loaded applications. |
| 2 | Application Title | The application title displays the name of the active application and lists the active user and role. You can double-click User and Role to display the User Settings dialog box, where the current role can be changed if multiple roles are available. |
| 3 | Search field | The Quicksearch offers predefined searches for dataset, element ID, element name or keyword as well as advanced search functions. |
| 4 | Navigation Window | Navigation Window provides quick access to your frequently used data. In addition to searching, organizing, and accessing data, you can configure the Teamcenter display and icons in the navigation pane to display only the perspectives you regularly use to perform tasks, in addition to searching, organizing, and accessing data. Click the Reorder button above the Search field to display the Order dialog box in the navigation pane, where you can hide areas in the navigation pane or change the order of the areas. |
| 5 | Application window | The application window displays the application perspectives open in your Teamcenter session. By default, the “First Steps” application perspective displays a single view First Steps . Application Perspectives consist of views that can be moved within the Teamcenter window or to the desktop. Such separate views remain associated with Teamcenter and continue to work in unison with other views. |
| 6 | Application button First Steps | Provides access to the “Getting Started” application. |
| 7 | Application Buttons | Application Buttons provide access to your most frequently used Teamcenter application perspectives. |
| 8 | Application Button Bar | The application button bar allows you to access Teamcenter application buttons that do not fit into the application button area of the navigation pane. |
| 9 | Clipboard button | The “Clipboard” button displays the Clipboard content dialog box. This window contains references to objects that were cut or copied from your workspace. The total number of objects in the clipboard is displayed to the right of the icon. |
2.2 Cut, Copy, Paste and Delete
| Cut | The cut function does not remove the object from the database, but only the reference to the file. |
| Copy | Copies the reference to the data. The data itself is not duplicated or copied. |
| Paste | The paste function is the same as in Microsoft Windows. |
| Delete | Removes data from the database |
| Drag and Drop | Drag and Drop has the same function as in Microsoft Windows. |
2.3 Organization
2.3.1 Access privileges & organization
- Persons
Real existing persons in the company with first and last names. One person can have multiple users.
⇒Max Mustermann
- User
Is the identification of a user in the system. Users can belong to several groups.
⇒Max Mustermann ⇒ Administrator & User
- Groups
Corresponds to summaries of users.
Group = Corresponds to a department or a project.
Groups can also be structured hierarchically (according to the company organization).
⇒Administrator ⇒dba, project administrators,…
- Roles
Activities of users in the organization (e.g. admin, employees, project managers, …). A user can be assigned different roles.
A role corresponds to certain rights that the user has.
2.3.2 Access rights & organization
Groups and roles can be used for:
- To manage the access rights (read, write, delete) per group and role
- Definition of control/approval instances (for workflows) based on groups and roles
- Organization of data according to the group you created.

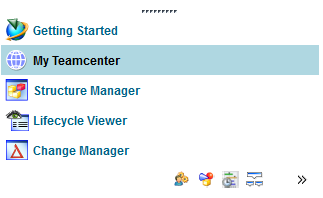
2.4 The most important Teamcenter applications
- My Teamcenter
- Is the work area for the use and administration of product information
(articles, documents, parts lists, specifications, requirements …) - Is the main point of use for many standard functions such as
- Search and find PDM data
- Create and modify PDM objects
- Check-in / Check-out of objects
- Administration of my tasks
- Starting and monitoring of processes / workflows
- Execute queries
- Structure Manager
- For creating, displaying, and changing product structures (BOM)
- Visualization tools
- Embedded Teamcenter Viewer
- Lifecycle Visualization
- Workflow Viewer
- To display an active or completed workflow process
- Project
- Create and manage Teamcenter projects including security rules at project level
- Classification(currently not used)
- Classification and categorization of Teamcenter objects according to a global or company-internal standard
- Change Manager
- Creating, administering, displaying, approving and executing product change requests and product change orders
2.5 Items & Items Revision
2.5.1 Basic information about the item data model
An item in Teamcenter is a structure of a connected object. The basic structure of each item consists of the following two objects:
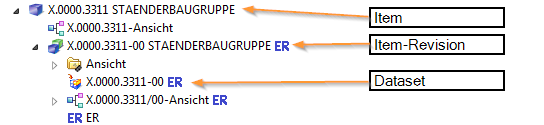
| Item | Collects data that is generally applicable to all revisions of the article. |
| Item Revision | Gather data applicable to a single revision of an article. |
| Dataset | The dataset forms the direct connection to the record on the Vault. |
2.5.2 Item
- Items are basic objects used to manage information
- They represent physical or conceptual entities that enable audits and information changes.
- Imagine an item as the top level containing all information about a particular object or product.
- The element ID is composed as follows - here in the example for the European MAG locations - X.0000.0000
- No two items may have the same item ID. An item ID is always unique!
- An item provides access to all the information needed to design a part, including any changes, together.
- When creating an item, Teamcenter also automatically creates an Item Master Form.
2.5.3 Item Revision
- Item revisions manage the changes to an item and save the changes within the item.
- When you create an item, Teamcenter automatically creates the Item Revision.
- There must be at least one item revision for each item.
- Item revisions are the items that receive a release status.
- Contains the SAP master form - this is the link between the SAP material number and the item in Teamcenter.
- Contains the dataset.
2.6 Datasets
2.6.1 Datasets Objects
Files that are started from Teamcenter with non Teamcenter applications (e.g.: NX, Word, Excel,…) are managed by Teamcenter ⇒ Dataset Objects.
Here are a few examples:
| Symbol | Type | File | Application |
|---|---|---|---|
 | Text | .txt | Text Document |
 | MS Word | .doc | MS Word Document |
 | MS Excel | .xls | MS Excel Table |
 | Direct Model | .jt | 3D Visualization Model |
 | UGMASTER | .prt | NX Partfile |
2.6.2 Importing a dataset
- You can insert datasets in Teamcenter under your item revisions.
- If the datasets are not yet stored in Teamcenter, you can import the dataset.
- If you import the dataset under your item revision, keep in mind that the dataset is not located under the item revision, but only under the item revision.
- The revisions that are revised from this item revision also have the dataset reference in the item revisions.
- You can also create a completely new dataset directly in Teamcenter.
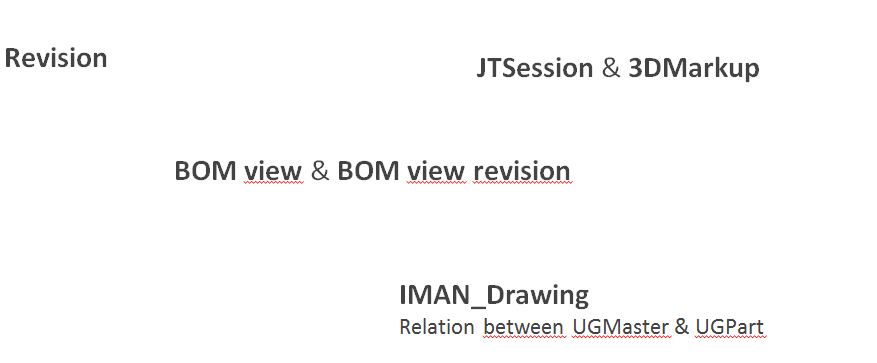
2.7 Relations
- Much information describes an article or is associated with the item that has revision
- Teamcenter uses relations to define the relationship between data objects and items/revisions.
Automatically defined relation types:
2.7.1 User-defined relation types
(e.g. when copying / pasting objects into an item / revision)
- Specification Relation
Documents of a revision. Are checked and locked accordingly when released (e.g. 3D master, drawings, NC programs,…).
- Requirement Relation
Contains criteria that must be met by the design, but do not define how the design is performed. (e.g. specifications)
- Altreps
(alternative representation) - Alternative description of the component (e.g. spring tensioned / not tensioned). As this is only a description of the condition, these will not appear in parallel in parts lists.
- Manifestation Relations
Relationship of documents with only explanatory character. These have no meaning in the sense of a relevant or legal product description (e.g. internal presentations, films, photos…).
- Reference Relation
General, undefined relationships between data objects and items / revisions.
(e.g.: field reports, technical articles, laboratory reports, notes…)
3. working in Teamcenter
3.1 Search queries
3.1.1 Search tools in Teamcenter
Query type
- Standard query
- Customer-specific query
Execution of query via
- Quick Search functions
- Advanced search
3.1.2 Quick Search Function

| 1 | Enter term… …complete or with wildcards * (wildcards for n characters)\ ? (wildcards for 1 character) |
| 2 | Perform search |
| 3 | Here you can choose what to search for: “ Dataset Name ” Item ID “ Item Name ” Keyword search\ “ Advanced search |
Note:
Quick search results cannot be added to your saved searches.
3.1.3 Advanced search

| 1 | Call advanced search |
| 2 | Enter search criterion |
| 3 | Selection of preconfigured / defined searches |
| 4 | Call / Selection of past searches |
| 5 | Saves the search in “my saved searches” |
| 6 | Sort search result |
| 7 | Search repeat |
| 8 | Deleting all search criteria |
| 10 | The search can be performed by pressing the ENTER key. |
3.2 Check-Out & Check-In
3.2.1 Basics for check-in and check-out
You can check items into and check them out of Teamcenter while retaining exclusive access permissions so that other users cannot make changes to the data.
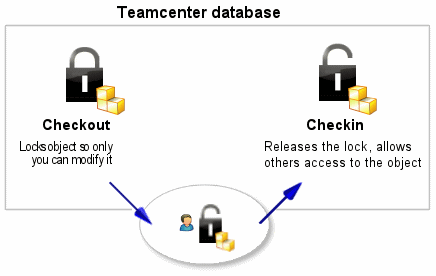
- The Check out option locks an item in Teamcenter so that only you can change it. However, other users can still view the item.
- The Check In option unlocks the item, allowing other users to access it.
3.2.2 Checking out a construction
Before you make any changes to your design, you must first check it out. This locks the element and prevents other users from making changes at the same time.
- Select the element you want to update.
- Click Check out
 .
.
The Information window displays the object whose Checked out property is set to Y.

Now you can open the item and make changes.
3.2.3 Checking in a construction
If you have made a change to your design, you must then check it in. This unlocks the item so that it can be checked out and changed by other users.
- Select the item you want to check in.
- Click Check In on the toolbar
 .
.
The Checked out property is updated.

3.3 Structure Manager
3.3.1 Introduction
Structure Manager allows you to create common product structures that can be configured to display the product structure at a specific time or for a specific unit, such as:
- The current manufacturing design of the product
- The product structure that was valid on a particular date.
- A specific customer variant
By creating a single generic structure that can then be configured according to individual user requirements, assembly structures do not need to be duplicated. This avoids associated problems such as maintenance, redundant information and search complexity.
Structure Manager displays your product structure in a multi-level list format with indentations that you can easily browse. This list is similar to the bill of materials used by design departments to list manufacturing information.
Structure Manager works with other applications that define or use the product structure, such as Platform Designer, Design Context, Multistructure Management, Manufacturing Process Planner and Part Planner.
3.3.2 Opening the Structure Manager
The Structure Manager can be started via the navigation window.
This opens the application with a new and empty window.

3.3.3 Opening the Structure Manager
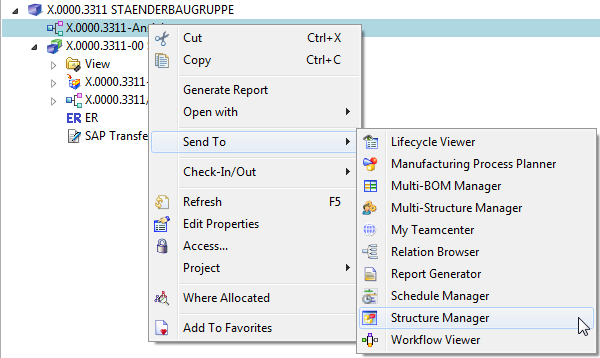
To open an existing BOM View Revision (BVR) in the Structure Manager, use one of the following options:
- Double-click on the BOM view (View)
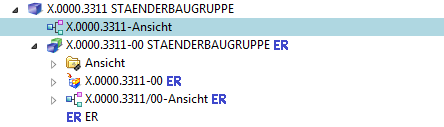
- Select the view (View) & (Ctrl+O) or from the File Open menu.
- Right mouse button on selected view Send to structure management
3.3.4 Overview structure manager
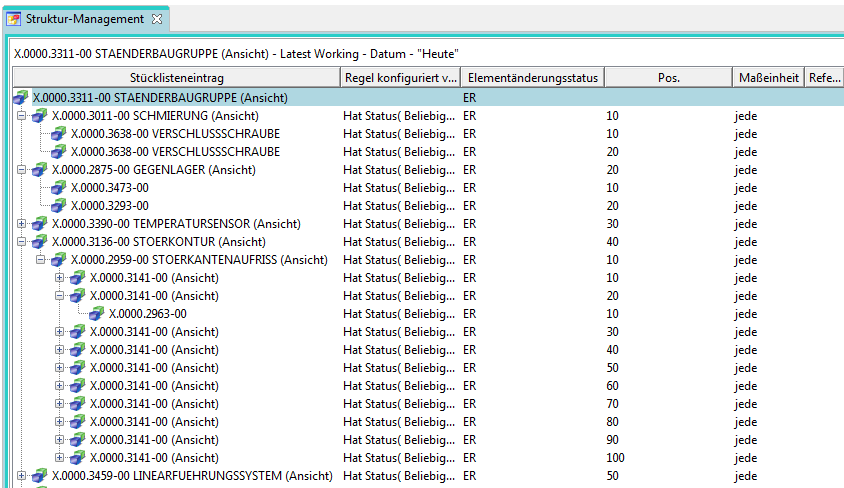
- Display of the assembly structure in the form of expandable tree diagrams in list form
- Corresponds to the design structure coming from CAD, but components without geometry (additive, auxiliary materials…) can also be stored.
3.4 Workflows
3.4.1 Introduction
All objects in progress go through several processes until they are completed.
- Workflow
- Sequence of processes
- Performed on 1:n Object(s)
- Process
- 1:n Activities / Tasks
- Performed by different resources (e.g. users) in different roles.
- Result
- e.g. status change of objects
3.4.2 Starting a workflow process

- Select the object(s) [of an item revision]
- Start process dialog <STRG>+<P>
- Process definition in the dialog window “New process “
- Process template: “FFG 01 Engineering Release”
- Process start → “OK”
3.4.3 Process indicators
- Objects which are currently in a workflow are marked as follows:

- Objects that are in a workflow and you need to share are displayed in
 }.
}.
- After starting the workflow you can select the desired neutral formats of all objects (part or structure) in the workflow in. As shown in the screenshot below, you must double-click on
 and perform a check-out. Then you can edit the “ProcessControlForm”, save it and check it in again.


- Then select
 “Perform task” through. Here you can now send further task instructions to the employee in the next step when you perform a “Peer Review”. When performing a “Self Review”, you are the final releaser of the engineering release - then the desired neutral formats are created.
4. Teamcenter Integration for NX
4.1 Teamcenter Navigator
- The Teamcenter Navigator shows the current folder structure of the user.
- The columns can be adjusted as required.

- The following file operations are possible with RMT:

| 1 | Cut and Copy has the same effect as in the “My Teamcenter” environment |
| 2 | Opens the “Add Component” dialog |
| 3 | Add the object to a project |
4.2 Teamcenter Navigator Search

| 1 | Search with wildcards like in the Teamcenter area |
| 2 | Advanced Search |
| 3 | Load options for assemblies |
4.3 Teamcenter Navigator Advanced Search

| 1 | Search criteria |
| 2 | Search for: |
| 3 | View last search |
| 4 | …Searches saved in “My Teamcenter” |
4.4 Teamcenter functions in the assembly Navigator
- Keep all Teamcenter information up to date

| 1 | Update information from Teamcenter |
| 2 | Add the object to a project |
4.5 Create and save parts
- The creation of a new item in Teamcenter is performed in NX as follows:
Step 1:
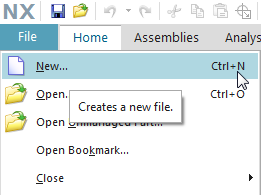
| 1 | Create a new data record via file → New… |
| 2 | Create a new data set via Ctrl+N |
- The creation of a new item as master part is visible as relationship “master” and contains the model.
- The creation of a new non-master part is visible as relationship “specification” and contains the DrawingPart.
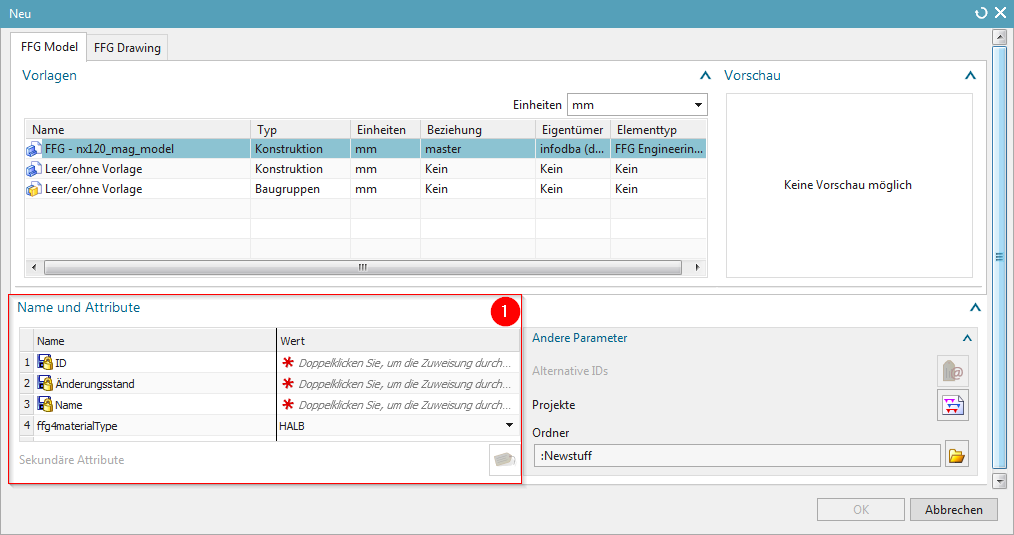
| 1 | Here certain mandatory attributes must be assigned to the newly created item. |
4.6 Revise and save parts
- The revision of Master parts takes place with:
Menu File → Save → Save as… - Create as new change state (revision)
- Save as new element creates a new part under a new part number
- Save as Alt-Rep creates a new dataset with altern. Geometry presentation under the current part / revision master.

| 1 | Save as action - New element / New change status |
| 2 | Double-click to assign a new revision status number to the Item Revision. |
- If an item revision contains dependent files in addition to the master part, the documents to be adopted can be selected if this is defined in the preferences.
4.7 Assemblies in Teamcenter Import or Export
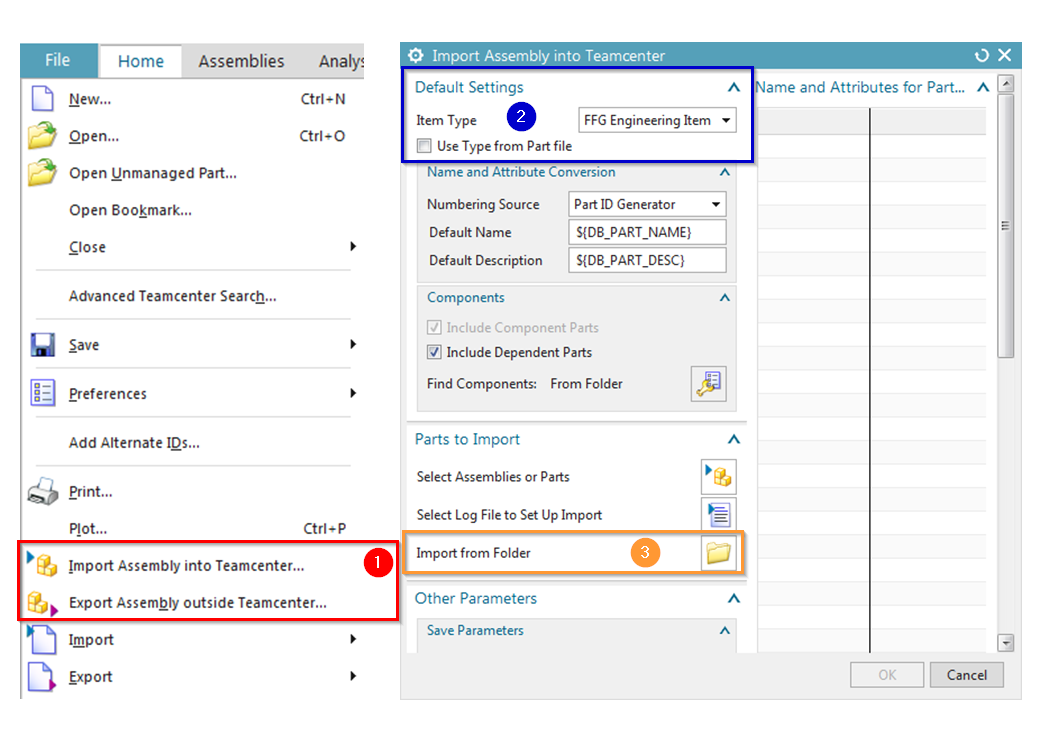
| 1 | Call the import/export function via file → BGR to TC imp. / BGR except from TC export. |
| 2 | The element type must always be FFG Engineering Item. |
| 3 | If you want to import an unloaded assembly completely to TC, select the function “Import from folder”. Then a dialog appears and select the highest assembly node. To import drawings of the assemblies and individual parts, you must check the option “Include dependent parts”. |
Solid Edge
1. Solid Edge 2023 Update
Teamcenter Documentation
1. Overview
2. Teamcenter Basics
3. Working in Teamcenter
4. Working with CAD applications
5. Working with the structure manager
6. Workflows in Teamcenter
EPLAN - integrate2
1. Preamble
2. Function Description
3. Operating the Integration
4. Troubleshooting