User Tools
Table of Contents
8 Release process
8.1 Fundamentals
In Teamcenter, processes (workflows) are implemented for several release levels. A release of a revision in Teamcenter means that this revision can no longer be changed and receives a certain status. In addition, a release date and the releasing person are noted on the revision and a neutral format generation takes place, where the formats can be selected. Possible formats are JT, PDF, Tiff, STEP, IGES, DXF and DWG.
A set status cannot be reset. After a revision has been released, a new revision must be created in order to make changes. Conversely, a new revision can only be created if the previous revision has a status.
The following release levels are provided:
Engineering Release (ER): This release is used to define a revision in the PLM system. Optionally, a “self-release” without check (“review”) or a check according to the “4-eye-principle” is carried out.
When the release is set to “ER”, there is no SAP transfer. A new revision can be created without a change notice (change notice or simply change).
Preseries (pre-series, PS): This release requires a check according to the “4-eye-principle”. The auditor can be selected by the initiator of the workflow, but must come from his group (“KV”) and have the role “Design Admin”. This is preset by the workflow. When releasing after “PS”, an SAP transfer takes place. The SAP system is automatically selected on the basis of the current group of the releasing person, for example, in the group “EI” PE1 is transferred to the SAP system.
A distinction is made between “initial release” and “subsequent release”. With the first release, a revision of a part is set to the status “PS” for the first time; this does not have to be revision 00, since only the status “ER” can be set beforehand. For a follow-up release, a change is mandatory so that the changes can be tracked.
8.2 Engineering Release (release after "Er")
During release, certain conditions are checked without which the workflow does not start. These are conditions for a design release:
- This is an object of type “FFG EngItemRevision”.
- All mandatory attributes are filled in
- The naming was selected from the naming catalog (naming ID is set).
- For an assembly, all components of the first stage must have the same or a higher release status, or the components must be contained in the same release workflow.
- All revisions have no status (are in “Working”).
To make a design release, proceed as follows.
Select one or more revisions to be released. These can be individual parts or assemblies.
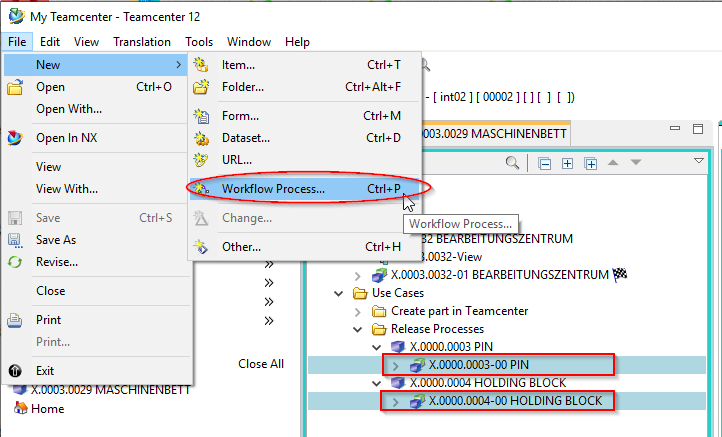
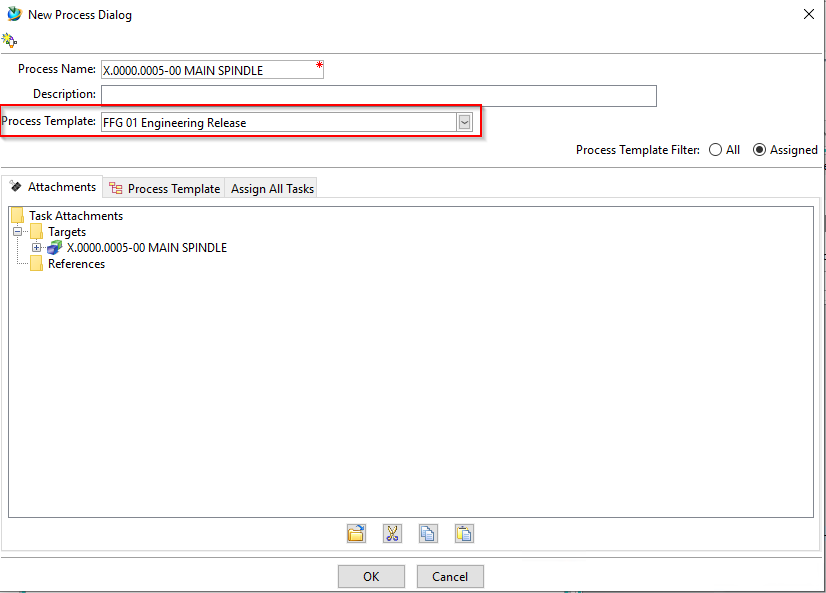
Select File → New → Workflow Process… or press Ctrl+P or Ctrl+P on the keyboard.
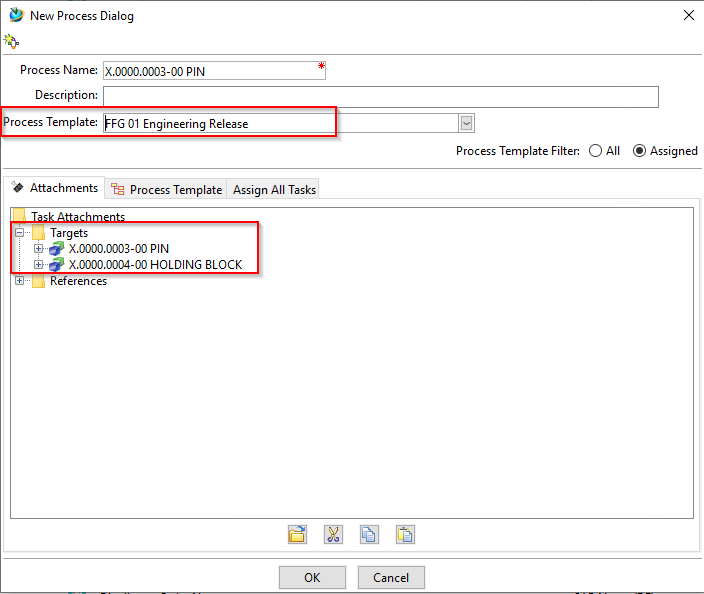
The workflow “FFG 01 Engineering Release” should already be selected. If not, select this workflow from the list of templates.
No further entries need to be made. However, it is possible to include or remove further revisions as so-called “targets” in the workflow. You can also assign a different name and/or a description (but this is not necessary or usual).
In Teamcenter Navigator, an icon  indicates that an object is in a workflow.
Press OK. If all conditions are fulfilled, the workflow starts and you can see the started workflow in your inbox
indicates that an object is in a workflow.
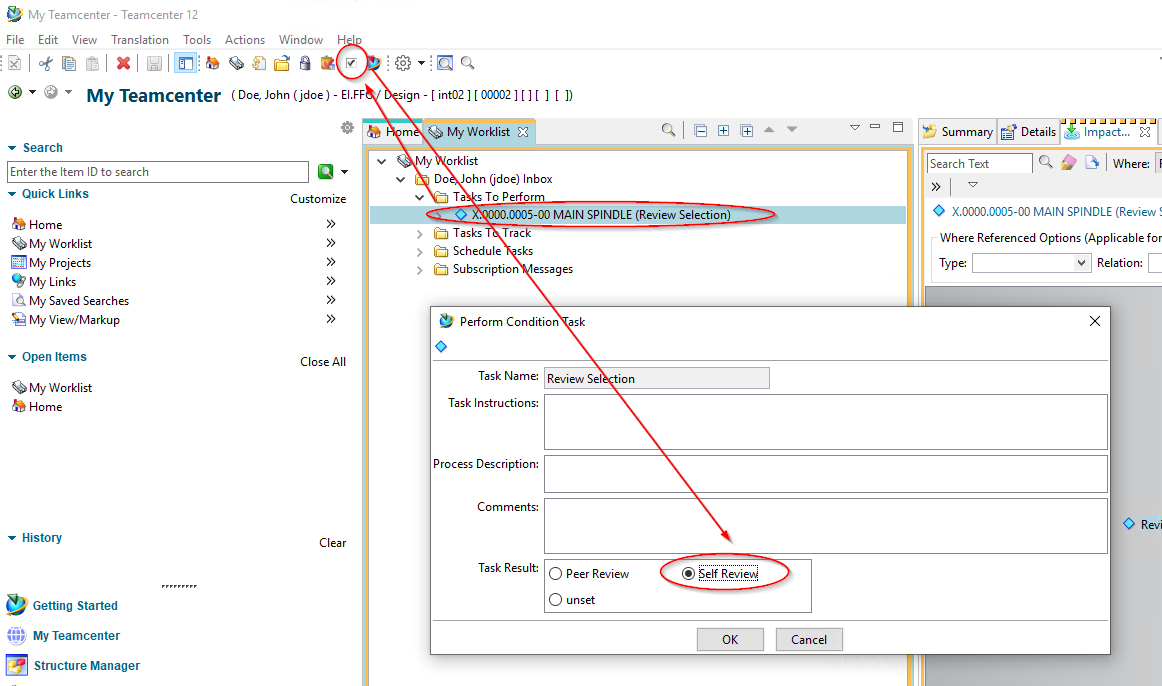
Press OK. If all conditions are fulfilled, the workflow starts and you can see the started workflow in your inbox  in the Teamcenter Navigator under {:uc_approvalprocess_en_004.png?nolink|}} “Task to be executed”. This is located in the process step “Review Selection”.
First open the entry “References” and double-click on the form “ProcessControlForm”.
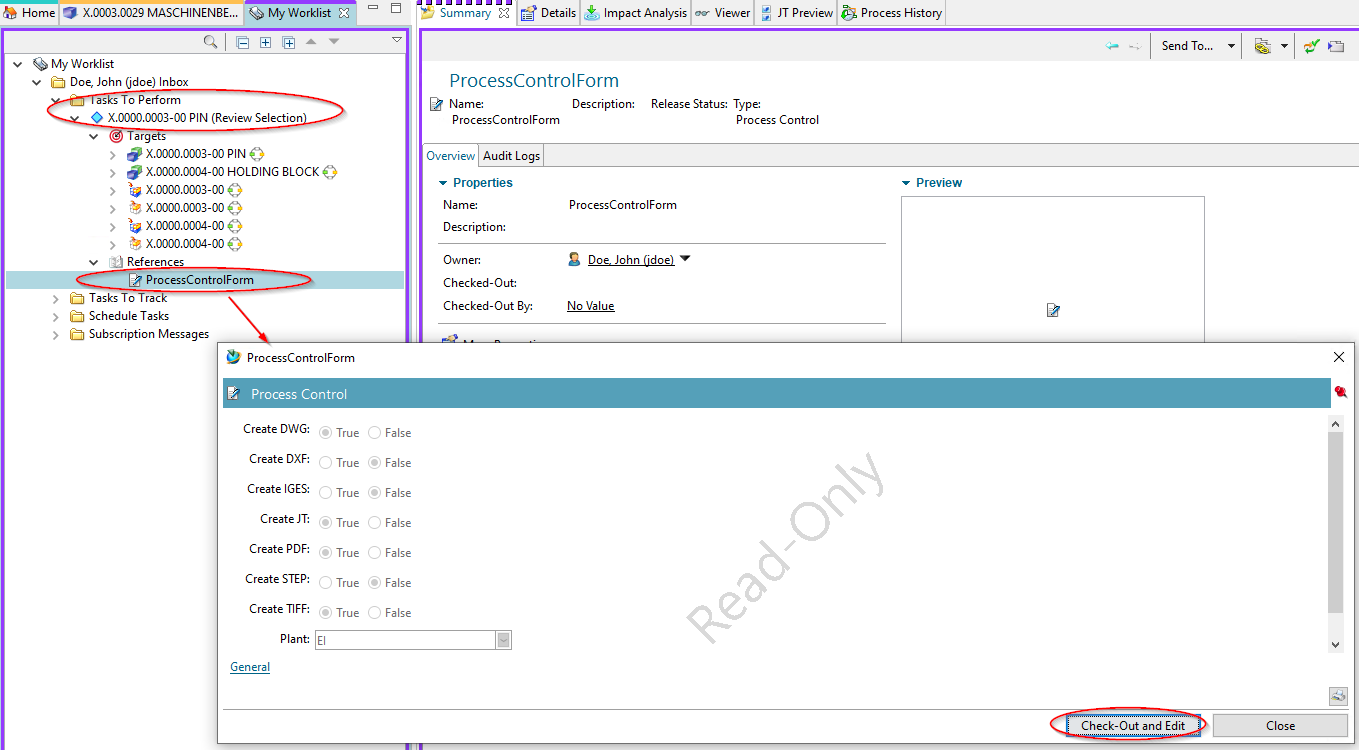
You can now select the desired neutral formats. The default formats are JT and PDF. If the default settings are sufficient, you can skip this step, otherwise press “Check-Out and Edit”.
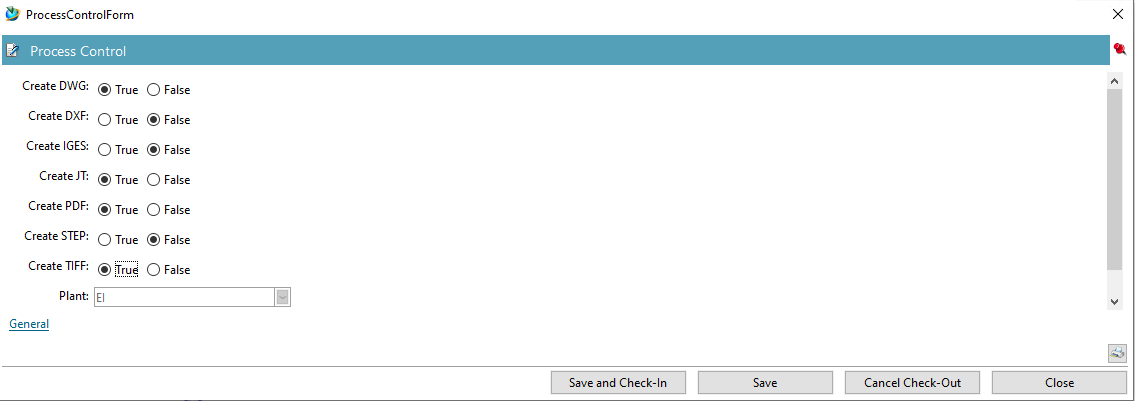
Select the neutral formats and press “Save and Check-In”. Then press the “Perform Task” button in the upper bar of the Teamcenter Navigator.
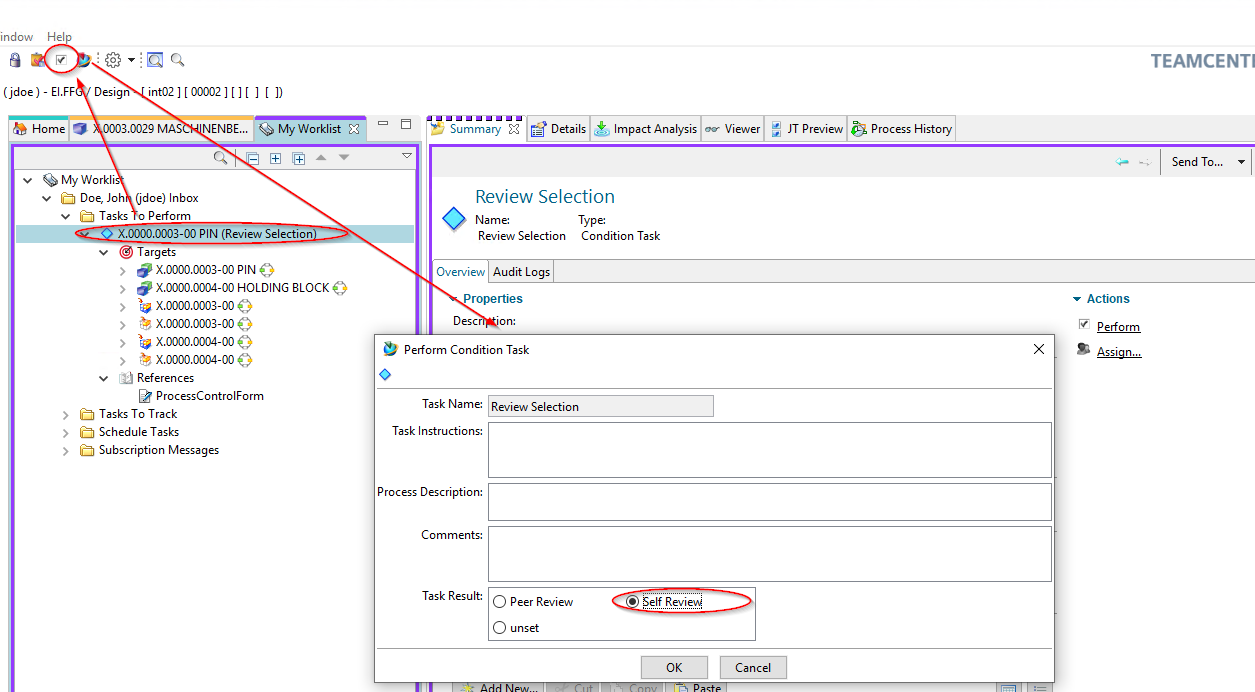
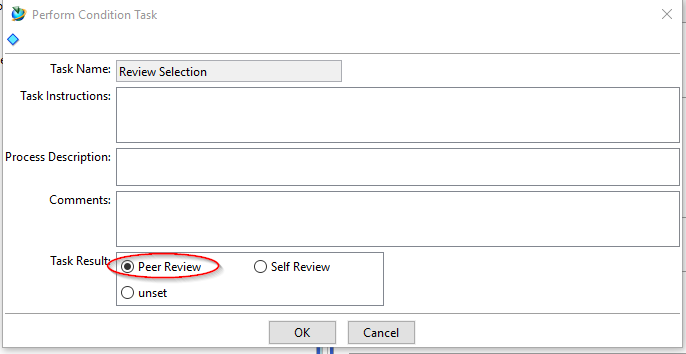
A menu opens in which you can select whether a self review or a peer review is to be performed.
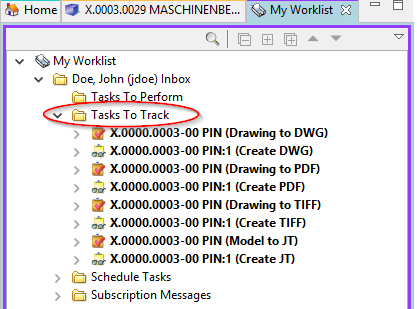
Press “Self Review”. No further steps are necessary. In the entry “Tasks to Track” you can track the workflow or the different tasks, e.g. you can see the subprocesses of the neutral format generation.
In the Teamcenter Navigator, a symbol xxxxxx indicates that an object is in a workflow. This means that the object is write-protected, changes are not possible.
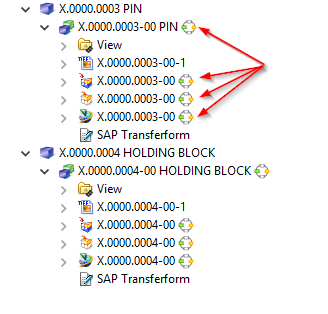
As soon as the workflow is completed, the release status (in this case “ER”) is displayed as an icon and text on the objects. In addition, the generated neutral formats are attached to the revision as datasets and have also been released.

8.2.1 Release with Reviewer
When releasing according to ER, you also have the option of specifying a “Reviewer”, i.e. releasing according to the “4-eye-principle”. To do this, select “Peer Review” instead of “Self Review” in the release dialog.
In the following dialog you can now select a “Reviewer”. The possible reviewers are preset, usually a person with the role “design admin” in the same group (“construction responsibility”) as the person who starts the workflow.
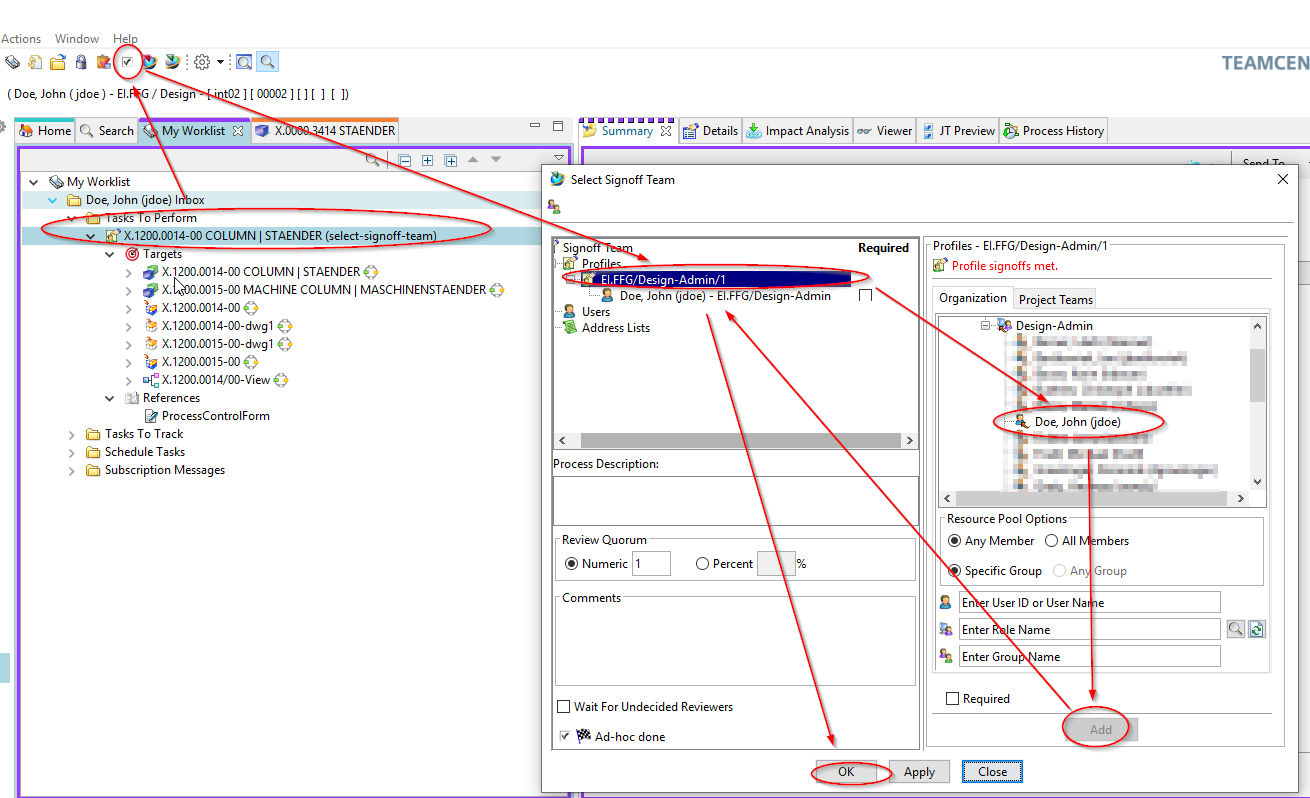
Press the “Perform” button in the menu bar.
Select a person from the right field of the “Organization” (in this case Doe, John (jdoe)), press “Add”.

The person is added to the Signoff team and is selected as the releasing person. You can now press “OK” to complete your entries.

The releasing person now receives the task in his/her “Inbox.”
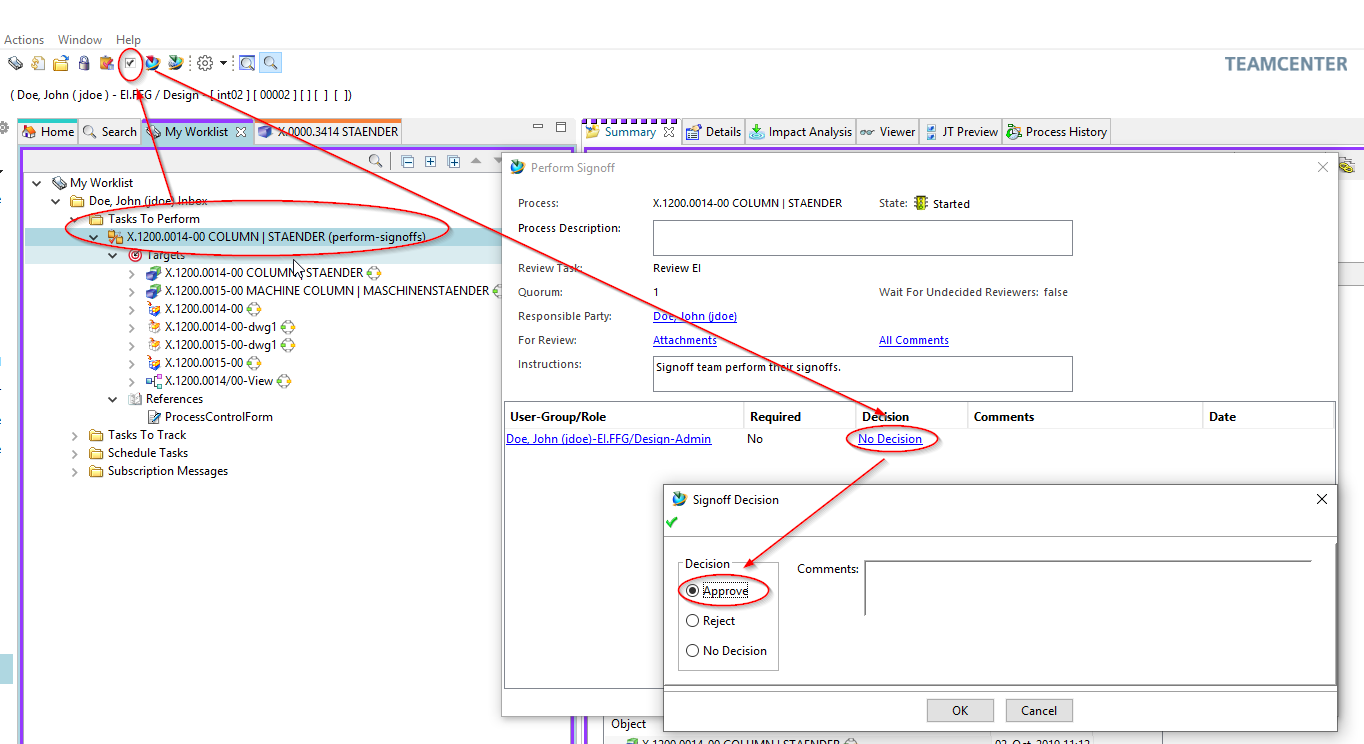
As the person who has released the task, select the task and press the “Perform” button in the menu bar.

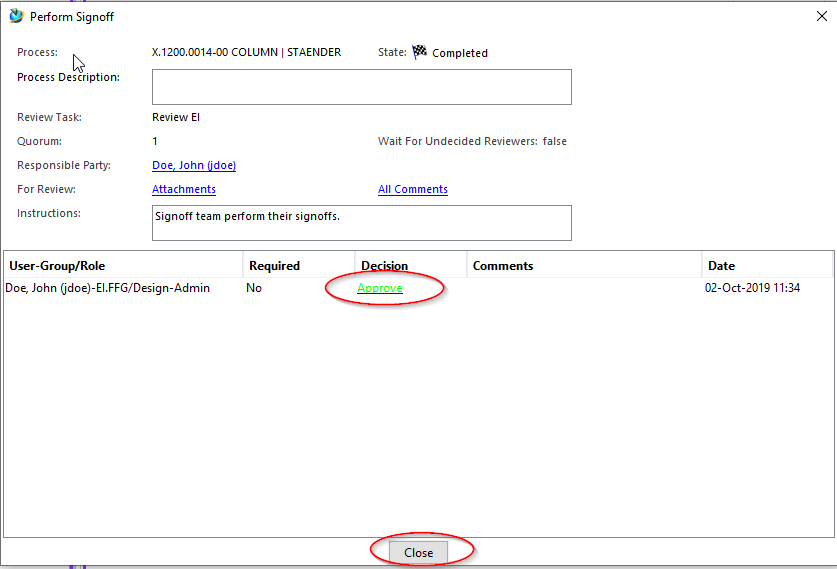
In the following dialog press “Decision”. Another dialog opens, in which you can confirm (“Approve”) or reject (“Reject”) the release.
Press “Approve”.
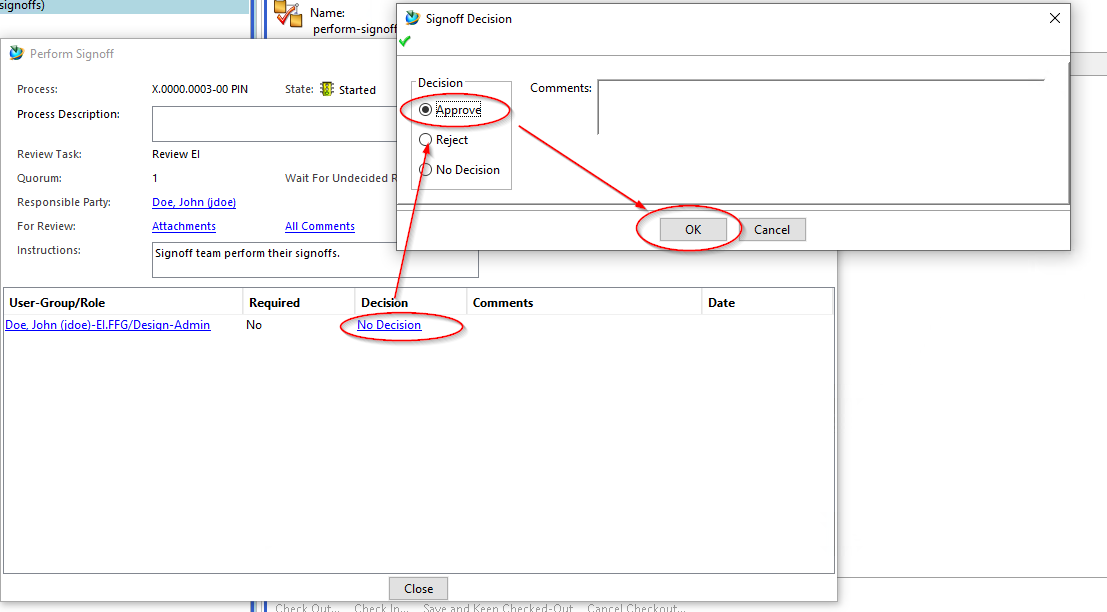
The decision is displayed in green, you can close the dialog with “Close”.
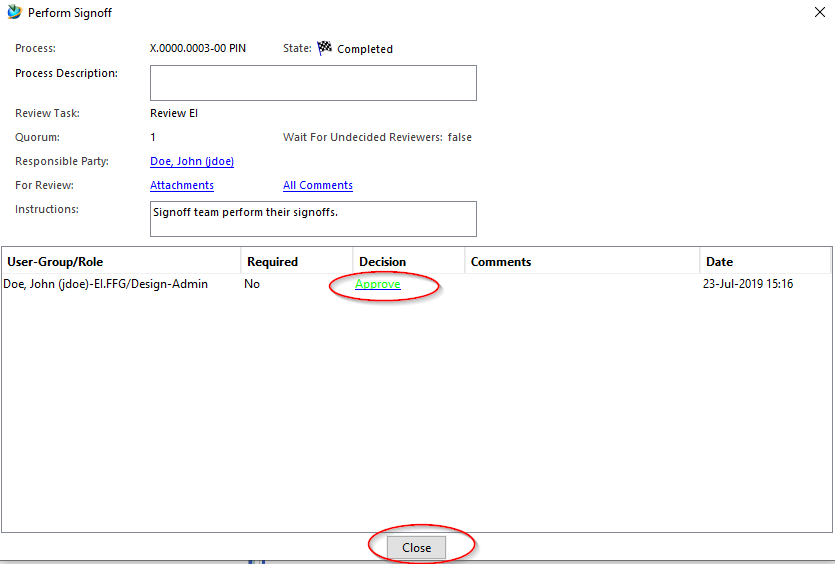
The release process now continues in the background, as a result the neutral formats are generated and released together with the revision(s) of the workflow to the status ER.
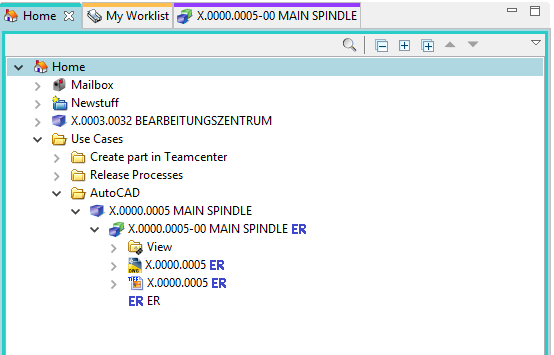
8.3 Engineering Release (release after "Er") for parts with AutoCAD drawing
The approval process of a part with an AutoCAD drawing is essentially identical to the approval process of all other parts. The only difference is that a Tiff is always generated from the AutoCAD drawing.
To release such a part select one or more revisions and select “File → New → Workflow Process…” or “Ctrl+P” or “Ctrl+P”.
In the following dialog select the workflow “FFG 01 Engineering Release”, if it is not already selected.
Press “OK”.
Select the new task in your inbox and press the “Perform Task” button.
In the following dialog select “Self Review” and press “OK”.
After a while the revision and the AutoCAD dataset get the status “ER” and a TIF file was created which also got the status “ER”.
8.4 Serial release (release after "SE")
When you release a series, that is, release it to status SE, the data is transferred to SAP. The material master, structure (if available) and documents (info records and files) are transferred.
The series release can be started by any designer. This means that a person from the same group (for example, “EI”) with the role “Design-Admin” must approve the release.
After the serial release, a part can no longer be changed except by administrative intervention.
During release, certain conditions are checked, without which the workflow does not start. Condition for a series release are:
- It's an object of the FFG EngItemRevision type.
- All mandatory attributes are filled in
- The naming was selected from the naming catalog (naming ID is set).
- For an assembly, all components of the first stage must have the same or a higher release status, or the components must be contained in the same release workflow.
- All revisions to be released do not already have the status “SE”.
To make a series release, proceed as follows:
Select one or more revisions to be released. These can be individual parts or assemblies.
Note:
You can select the revisions both in the “Teamcenter Navigator” and in the “Structure Manager”. In this example we will make the selection in the “Structure Manager”.
Select “File → New → Workflow Process…” or press Ctrl+P or Ctrl+P on the keyboard.

The dialog for creating a new workflow opens.

Select the FFG 03 Series workflow and press OK. No further input is required. However, it is possible to include or remove further revisions as so-called “targets” in the workflow. It is also possible to assign a different name and/or a description (but this is not necessary and also not usual).
Note:
If not all mandatory attributes have been filled in, a corresponding message is displayed and the workflow is not created.
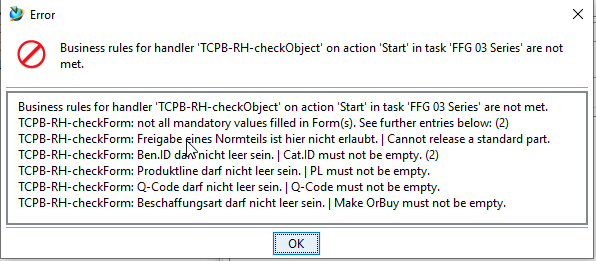
In this case, you can make any necessary changes and restart the workflow.
If all conditions are met, the workflow starts and you can see the started workflow in your inbox in the Teamcenter Navigator under “Tasks to Perform”. This is located in the “Review Selection” process step.
First open the “References” entry and double-click on the “ProcessControlForm” form.

You can now select the desired neutral formats. The default formats are JT and PDF. If the default settings are sufficient, you can skip this step, otherwise press “Check-Out and Edit”.

Select the neutral formats and press “Save and Check-In”.
Then press the “Perform Task” button in the upper bar of the Teamcenter Navigator.
A menu opens in which you can select a reviewer/releaser. The workflow ensures that this person can only be selected from your own group (KV) and has the role “Design-Admin”.
Select a person in the right menu window under “Organization” and press “Add”. The person is assigned to the profile in the left menu window and the “OK” button is activated.
Press “OK”. The window closes and the task is completed.
The following tasks are performed by the person selected to release the revisions. This person receives a release request by e-mail.
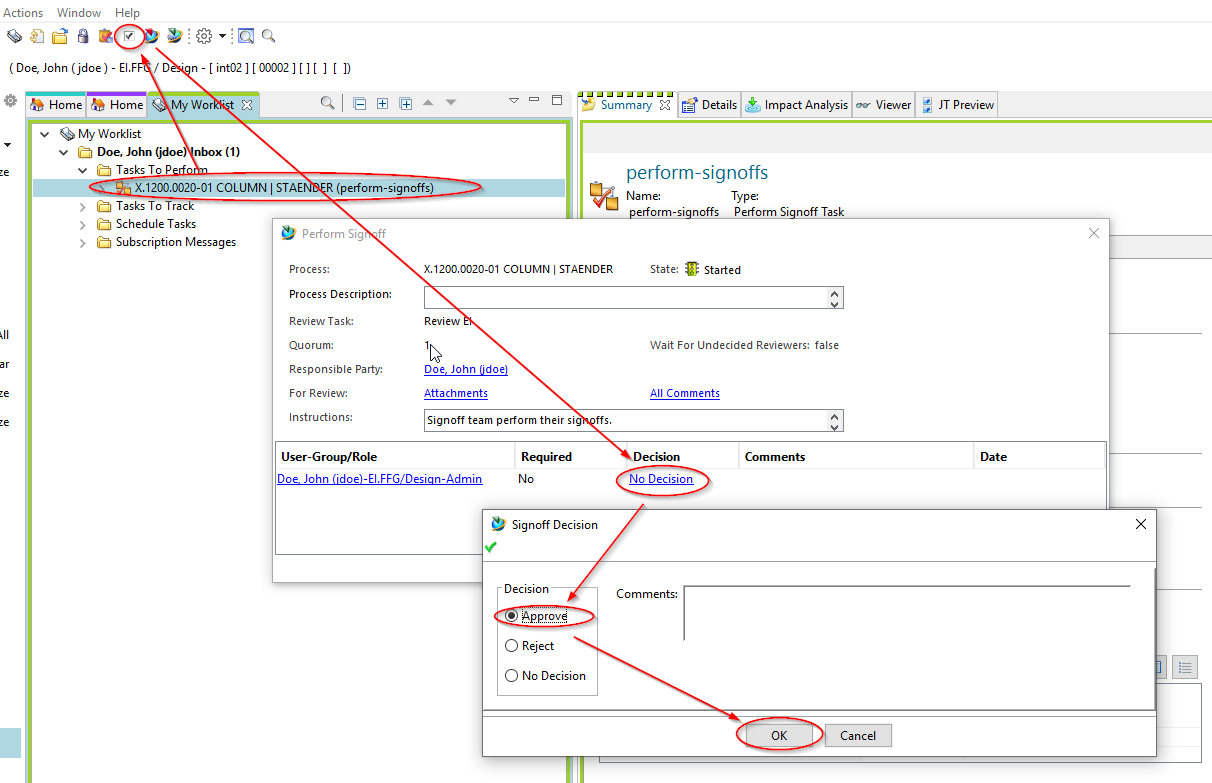
Select the task in the worklist under “Tasks to Perform”.
Press the button “Perform Task” in the upper menu bar.
In the following dialog press “No Decision”.
In the following dialog, section “Approve” and then “OK”.
The workflow now continues. After a short while, the “Approve” decision is displayed in green (or red for “Reject”). You can now close the dialog with “Close”.
Under “My Worklist → Tasks To Track” you can follow the workflow. In this example the neutral formats are created.

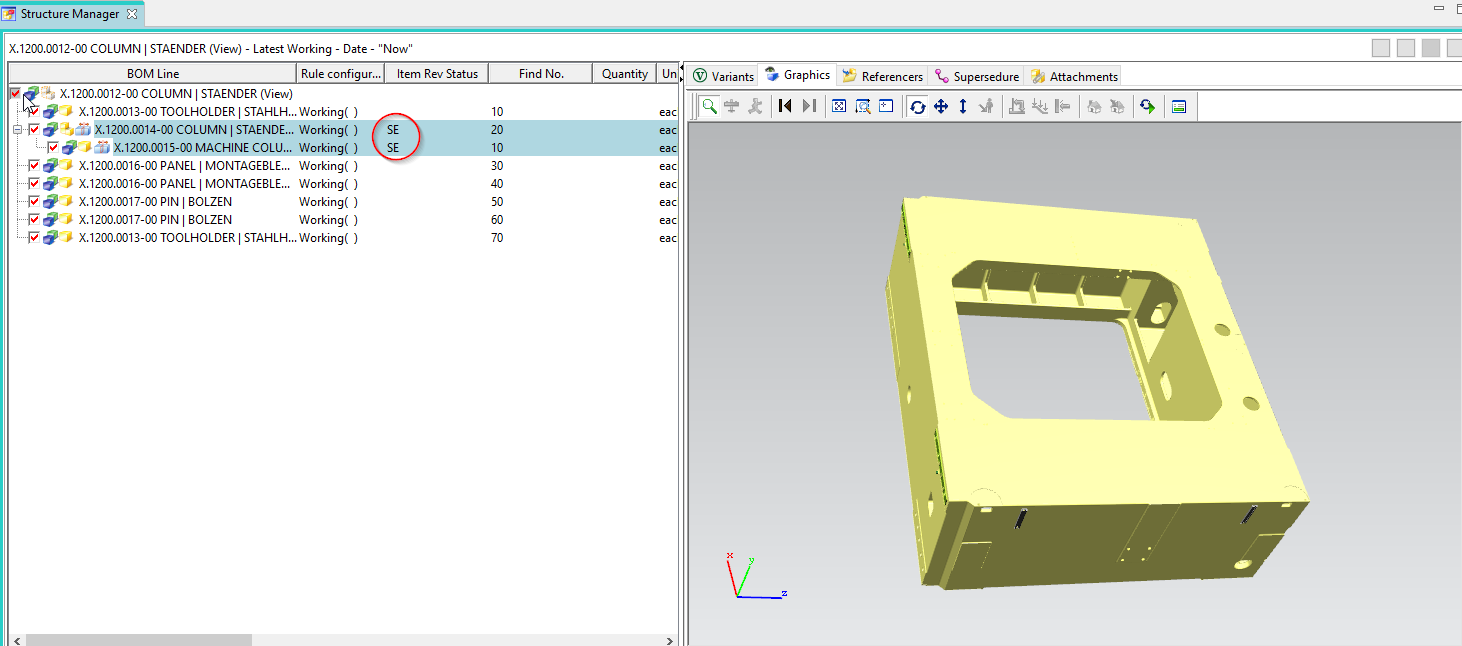
After the workflow has been completed, the creator of the workflow receives a notification by e-mail and the parts have the status “SE”.
The status is displayed in the column “Item Rev Status” in the structure manager.
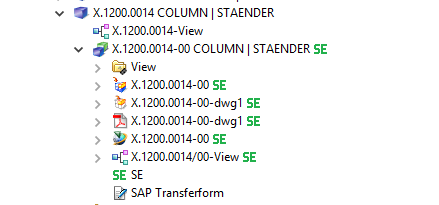
In the Teamcenter Navigator, the status is displayed as an icon on all released objects.
8.5 Changes and release after changes
If a part that already has series release is to be released again after a change, a change notice is required. In general, this is also referred to as a change.
However, a part can be revised without a change and can also be released with the status ER.
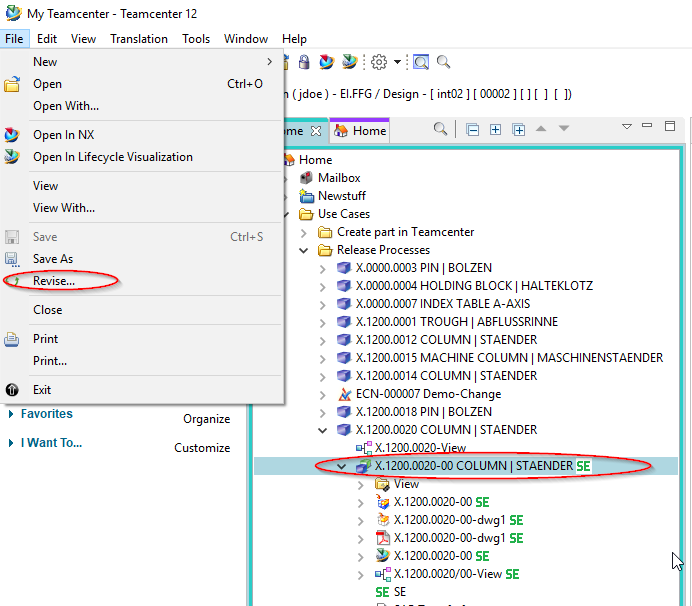
To make a change to a released part, first create a new revision. To do this, select an existing revision and then choose “File → Revise…”.
The revision dialog opens.

Press “Finish” without further input. In this example, revision 01 was created.

The model (UGMASTER) and the drawing (UGPART) are copied during revision. Please note that neutral formats such as PDF or JT are not accepted. These will be recreated if necessary or at the latest at release.
In order to release the new revision to the status “SE”, a change must exist. The creation of changes may require certain additional permissions under certain circumstances.
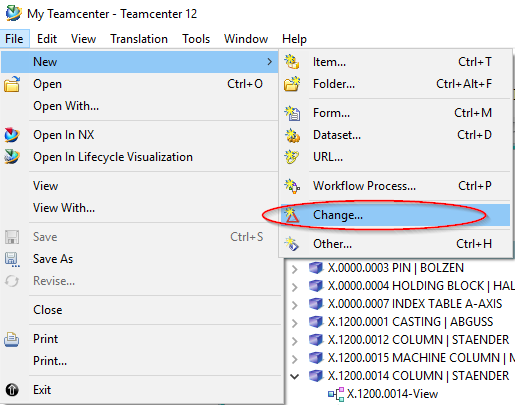
Select “File → New → Change…”.
The change number is automatically assigned by Teamcenter. The attributes “Overview” and “Description” are mandatory attributes and must therefore be filled in.
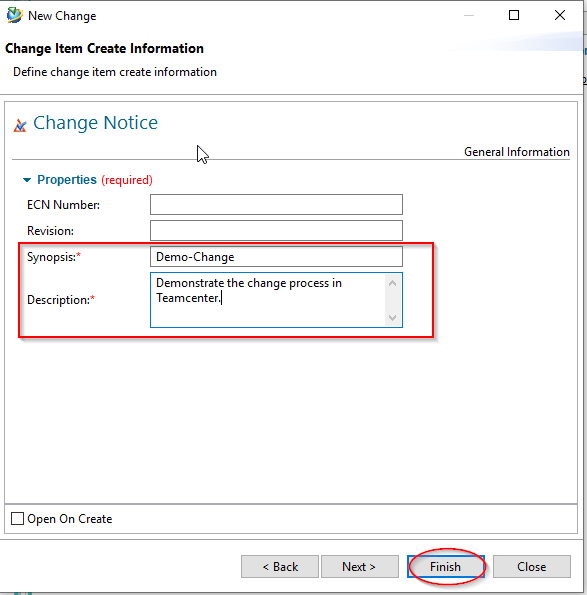
Enter any values for “Synopsis” and “Description” and press “Finish”.
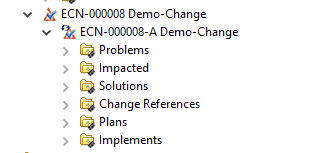
If you selected a folder, the Change object is inserted here. Otherwise the Change can be found in the Newstuff folder.
8.5.1 Adding participants
In order to be able to work on a change, you must be assigned to it as a participant. The person who created the change can assign participants with different roles to it. For the sake of simplicity, we at FFG will only use the role “Change Contributor”.
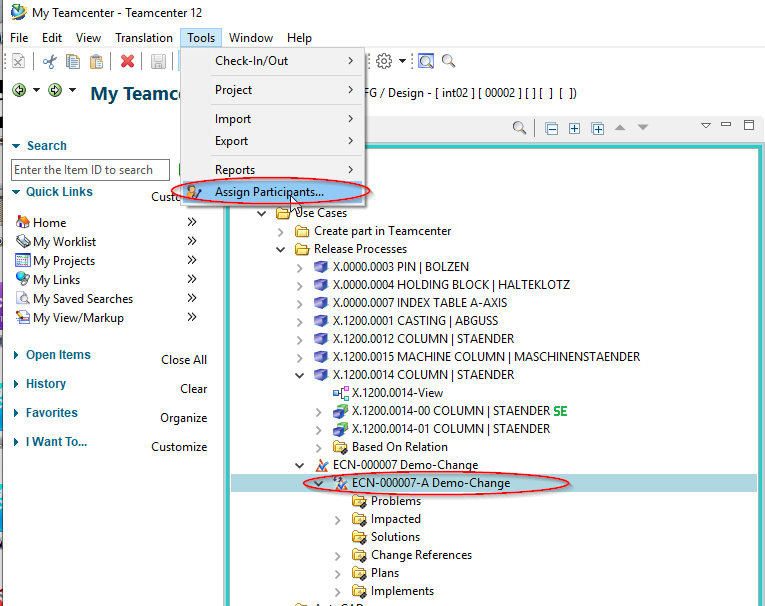
Select the revision (!) of the Change object and choose “Tools → Assign Participants…”.
The dialog for assigning persons known from the release process opens.

Select a person with the role “Design” from the organization and add them to the Change as “Change Contributor” with “Add”. If necessary, repeat the process for other persons.
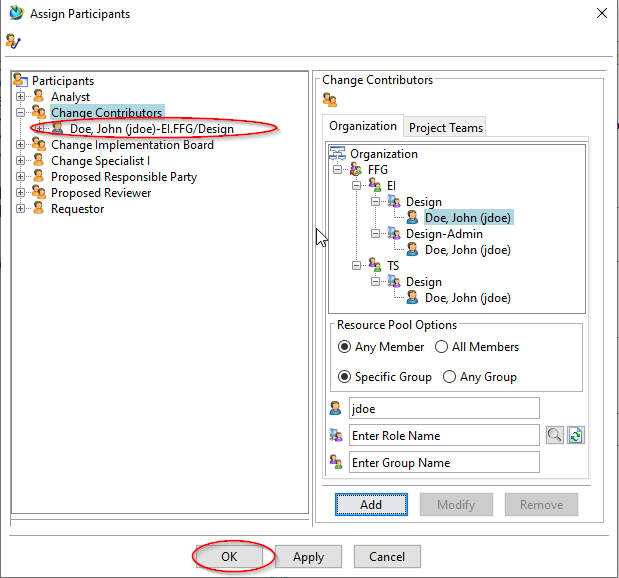
Then press “OK”.
8.5.2 Solution Items and Problem Items
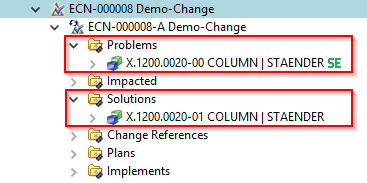
A change is used to track changes under a common change number. Due to changes, so-called “solutions” are created and assigned to the change. The items to be changed (i.e. those that cause “problems”) are assigned to the change as “problems”. In this example, revision 00 is a “problem” and revision 01 is the “solution”. New parts that do not have a previous revision can also be created as part of a change.
To add “Solutions” and “Problem” to the change, copy the corresponding revisions and paste them into the (pseudo) folders “Problems” and “Solutions”.
Then you can release the “Solutions”. Note that it is not the Change itself that is released, but the “Solutions” it contains.
8.5.3 Start of the release process
To release, select one or more revisions of the “Solutions” and press “Ctrl+P” or “Ctrl+P”.
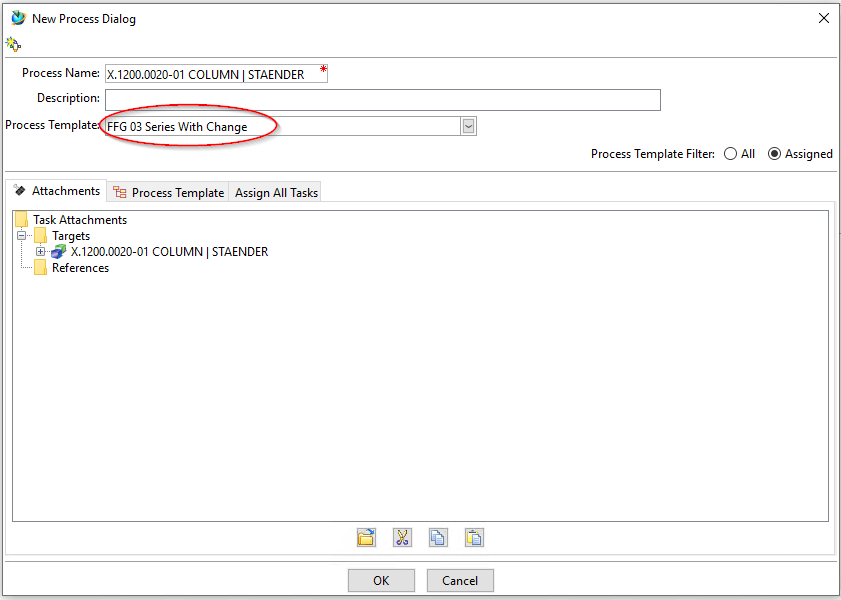
Now select the workflow “FFG 03 Series with Change”.
The rest of the procedure is the same as for series release.
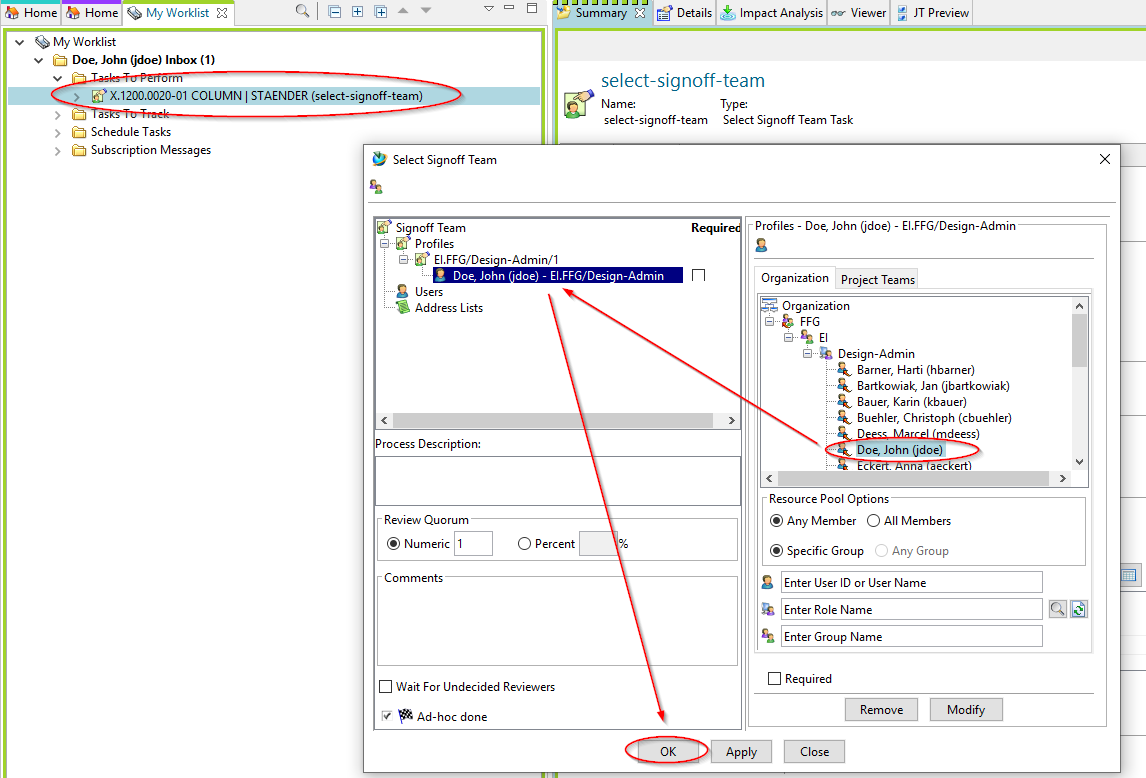
Select a person who is to perform a review according to the principle of dual control. The possible persons are predefined, i.e. they must have the role “Design-Admin” and be in your group (KV).
This concludes your task as a designer with the role “Design”.
8.5.4 Review and Release
When you receive a share request, select the appropriate task in your worklist and press the “Perform” button. The dialog for sharing opens.
Press the “No Decision” link, then the “Approve” button, then the “OK” button.
The workflow will now be processed further.

When the workflow has run through, the revision and all objects referenced under it are released and the neutral formats have been created. Note that this revision has now received a “change number”.
8.6 SAP transfer ("Growing bill of materials")
8.6.1 Introduction
Even during the development process, bills of material can be transferred to SAP without actually being released. In this case, parts and bills of material are not write-protected and can be processed further.
The following rules apply when transferring to SAP:
- The BOM, that is, the revision that represents the assembly, must not have the status “SE”.
- Components or sub-assemblies that have not already been transferred to SAP (i.e. are “in working” or have the status “ER”) are filtered out during transfer.
- After the transfer, the revision receives the status “PS”, but is not write-protected. The status “PS” indicates that the BOM or part has been transferred to SAP.
- If a revision already had the status “ER”, it can be transferred to SAP, but it remains write-protected, that is, the status “ER” is not reset.
8.6.2 Starting the SAP update
Select one (or more) revision(s) to be transferred to SAP. You can do this in the Teamcenter Navigator or in the Structure Manager.
Press “Ctrl+P”.

In the following dialog select the workflow “FFG 10 SAP BOM Update” and press “OK”. There is no further query, the workflow starts immediately.
After the workflow has run through, you will see the status “Preseries” or “PS” at the revision and at all objects below it. In addition, a so-called “snapshot” with the name “SAP Update” is created, which contains the parts contained in the structure at the time of the call, so that the respective changes can be traced.

Solid Edge
1. Solid Edge 2023 Update
Teamcenter Documentation
1. Overview
2. Teamcenter Basics
3. Working in Teamcenter
4. Working with CAD applications
5. Working with the structure manager
6. Workflows in Teamcenter
EPLAN - integrate2
1. Preamble
2. Function Description
3. Operating the Integration
4. Troubleshooting