User Tools
Table of Contents
2. Function description
2.1. data model
The data model describes the objects in Teamcenter that are used by the integration to store project information.

Legend:
- Blue boxes: Items
- Orange boxes: Items
- Grey boxes: Datasets
2.2. module dialogs
The integration functions are started as separate modules with their own dialogs from the Integrate menu in EPLAN.
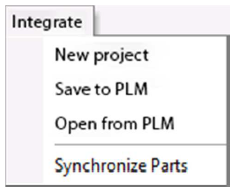
Menu: Integrates
- New Project: Creates a new project.
- Save to PLM: Manages all relevant project information in Teamcenter, for example the original project files, generated output files and the parts list(s).
- Open from PLM: Downloads the project files from Teamcenter and opens the project read-only or for editing in EPLAN.
- Synchronize Parts: Manages parts, items and attributes bidirectionally between the library and Teamcenter.
All module dialogs have the same structure and are divided into the following areas:
- Menu bar
- Main functions
- Event log
2.2.1 New Project
Use this integration module to create new projects based on templates or existing projects.
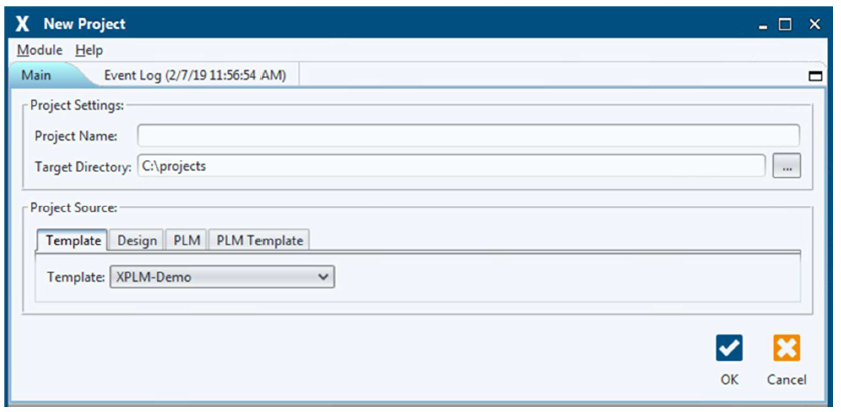
Area: Project Settings
In this area you can define the project name and the project directory.
Project Name: Defines the name of the project. Target Directory: Defines the directory where the project will be saved.
Project Source
You can select a template or an existing project in this area.
| Template: | Displays a selection list for templates stored in the template directory. |
| Design: | Opens a selection dialog for projects stored in the file system. |
| PLM: | Opens a search dialog for projects saved in Teamcenter. |
| PLM Template: | Displays a selection list for templates stored in Teamcenter. |
Buttons
| OK: | Creates the project from the selected source, opens it in EPLAN and closes the module dialog. |
| Cancel: | Closes the module dialog without further actions. |
2.2.2 Save to PLM
Use this integration module to manage EPLAN engineering information in Teamcenter.
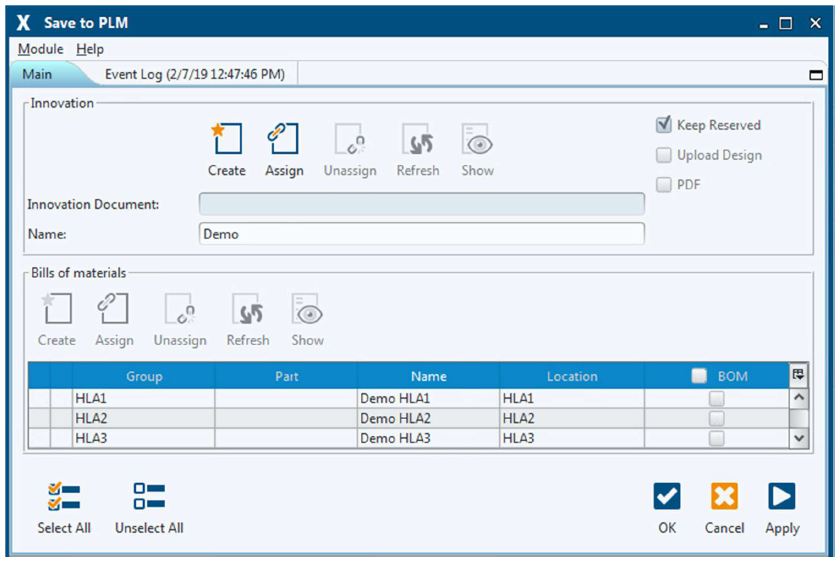
Area: Innovation
In this area you can manage the project, the corresponding schematic and the reservation in Teamcenter.
| Create: | Creates a new data model object in Teamcenter and links it to the project. |
| Assign: | Opens a search dialog to select an existing object in Teamcenter and link it to the project. NOTE: If supported, the search dialog opens directly in PLM. |
| Unassign: | Removes the link information in the project. |
| Refresh: | Updates the object properties of Teamcenter. |
| Show: | Displays the object in Teamcenter. NOTE: Function may not be available on all PLM systems. |
| Keep reserved: | Option to control the reservation for the object and the current user in Teamcenter. |
| Upload design: | Option to create a ZIP file of the project files and save the result in Teamcenter. |
| PDF: | Option to create a PDF file of the schematic and save the result in Teamcenter. |
Area: Bills of materials
In this area, you can manage the BOM headers and the corresponding BOMs in Teamcenter.
| Create: | Creates new data model objects in Teamcenter and links them to the selected entry. |
| Assign: | Opens a search dialog to select an existing object in Teamcenter and link it to the selected entry. NOTE: If supported, the search dialog opens directly in PLM. |
| Unassign: | Removes the link information for the selected entry in the project. |
| Refresh: | Updates the object properties of Teamcenter. |
| Show: | Displays the object in Teamcenter. NOTE: Function may not be available on all PLM systems. |
| BOM: | Option for exporting and uploading the parts list to Teamcenter and for linking existing items. |
| Layout BOM: | Option to display the assembly side of the component (top or bottom) in the BOM Comparison dialog and to include it in the parts list. |
Buttons
| OK: | →Updates the objects and their relationships in Teamcenter. →Updates the link information in the project. →Creates the activated output files. → Retains the reservation for the object and the current user. →Exports the parts list from the project, compares it with Teamcenter and opens the BOM Comparison dialog. |
| Cancel: | Closes the module dialog without further actions in Teamcenter. |
| Apply: | Like OK, but does not close the module dialog. The activated options are automatically reset after successful execution. New options can be reactivated and executed with OK or Apply. |
| Note: If the BOM option is activated, a selection must first be made in the BOM Comparison dialog before the module dialog becomes active again. |
2.2.2.1 Save to PLM
Before uploading the data to Teamcenter, the BOM Comparison dialog displays the compared EPLAN and Teamcenter parts lists in different views. You can check the parts list items in any view and cancel the upload if necessary.

Views
| Tag View: | Displays the compared parts lists with focus on the individual tags in the project. |
| Quantity View: | Shows the compared BOMs with focus on the summarized quantity for tags with the same part number. |
| Missing Parts: | Displays parts in the project that are not aligned with Teamcenter or for which no item number was found in Teamcenter. |
| Unreleased Parts: | Displays Teamcenter items that have been synchronized with EPLAN but are not released or are no longer released (obsolete). |
| Unassigned Parts: | Shows parts in the project for which no part number was found in the library. |
Filter options for identifying BOM changes:
| Added: | Displays parts list items in EPLAN that have been linked to items in Teamcenter. |
| Unchanged | Displays parts list items that are identical in EPLAN and Teamcenter. |
| Modified: | Displays changed BOM items. |
| Removed: | Displays previously synchronized BOM items that still exist in Teamcenter but have been deleted in EPLAN. |
| Missing: | Displays parts list items in EPLAN that must be created in Teamcenter. |
Buttons
| OK | →Uploads the selected output files and BOM items to Teamcenter. →Close the BOM Comparsion dialog. |
| Cancel | Closes the BOM Comparison dialog without further actions in Teamcenter. |
2.2.3 Save to PLM
Use this integration module to download and open Teamcenter projects.
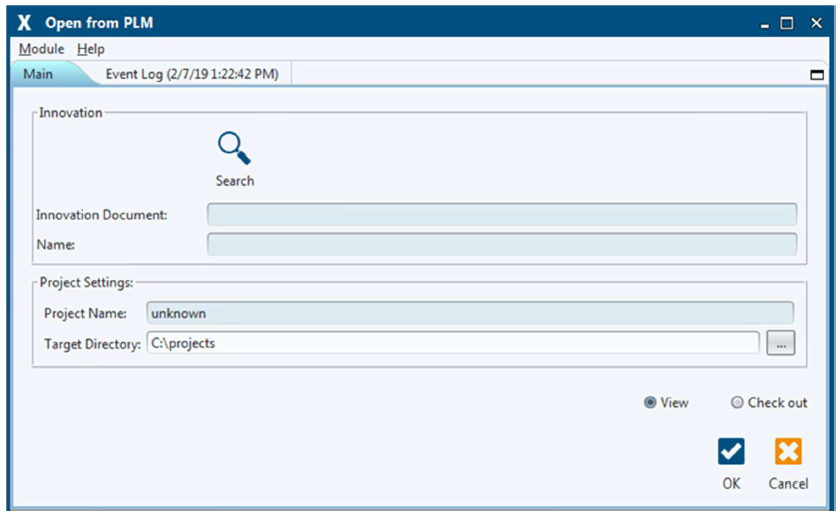
Area: Innovation
In this area you can search for objects in Teamcenter.
| Search: | Opens a search dialog to select an existing object in Teamcenter. NOTE: If supported, the search dialog opens directly in PLM. |
| Innovation Document: | Displays the returned number and revision of the object in Teamcenter. |
| Name: | Displays the returned name of the object in Teamcenter. |
Area: Project Settings
In this area you can change the project directory if necessary.
| Project Name: | Displays the derived directory name to be created in the file system. NOTE: If the project is opened read-only, the prefix view is automatically added to the directory name. |
| Target Directory: | Defines the directory in which the project should be saved. |
Options: View/Check out
With the options View and Check out you can open the project read-only or editable. See the following table for more information.
| Teamcenter status | Opening option | Description |
| Not reserved | View | Opens the project write-protected in EPLAN. Edited project files cannot be saved back to Teamcenter. |
| Not reserved | Check out | Opens the project for editing in EPLAN and reserves it for the current user in Teamcenter. |
| Reserved by current user | View | The option is deactivated. |
| Reserved by current user | Check out | This option is activated by default. If the project is reserved by the current user and available in the target directory, a warning message is displayed with the option to overwrite the project files with the status from Teamcenter. If the project is reserved by the current user on machine A and the same user tries to open the project on machine B for editing, an error message is displayed. In this case, the user must first save the project on machine A and delete the reservation in order to be able to edit it on machine B. The user must then save the project on machine A and delete the reservation. |
| Reserved by other user | View | Opens the project write-protected in EPLAN. Edited project files cannot be saved back to Teamcenter. |
| Reserved by other user | Check out | The option is selectable, but machining is not possible. An error message is displayed. |
| Released | View | Opens the project write-protected in EPLAN. Edited project files cannot be saved back to Teamcenter. |
| Released | Check out | The option is selectable, but editing is not possible. An error message is displayed. |
Buttons
| OK | Opens the project read-only or editable. |
| Cancel | Closes the module dialog without further actions |
2.2.4 Synchronize Parts
Use this integration module to synchronize components, items and their attributes between EPLAN and Teamcenter.

Menu bar:
In this module dialog the menu bar contains additional entries:
| Items | |
| Add | |
| With Class Hierarchy: Opens a selection dialog to search for parts by class and load the result into the Overview section. |
|
| Missing Parts: Opens a dropdown menu to select the missing parts from the last BOM upload and load them into the Overview section. |
|
| Exclude: | Removes parts from the Overview area. |
| Refresh: | Updates the parts and attributes in the Overview area. |
| Synchronize | |
| Select All: | Selects all components in the Overview area. |
| Synchronize: | Synchronizes the selected parts between the library and Teamcenter. |
| Link: | Link component to item. |
| Open in Teamcenter: | Displays the item object in Teamcenter. |
Quick search and toolbar
- The quick search supports the search by part number, item number or name.
- The toolbar also contains the same functions as the Synchronize menu.
Area: Overview
The added parts are displayed in this area. You can filter parts according to the following criteria:
| Unchanged: | Shows unchanged and calibrated components. |
| EPLAN Only: | Displays components that exist only in EPLAN. |
| Teamcenter Only: | Displays items that only exist in Teamcenter. |
| Changed: | Shows differences in attribute values. |
To quickly find a part in the tree structure, press CTRL+F. This opens the tree search dialog:
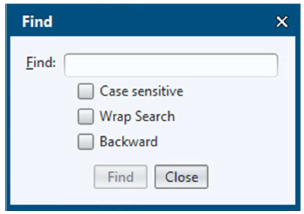
In this dialog, you can search for any value displayed in the tree structure.
| Case sensitive: | Searches for case sensitive values. |
| Wrap Search: | TBD |
| Backward | Search bottom-up, not top-down. |
| Find | Start the search. |
| Close | Close the dialog. |
Note:
To quickly remove the components from the Overview area, press CTRL+A to select all, followed by Delete.
Area: Details
This area displays the compared attribute values of the selected parts:
| Left column: | Displays the value in EPLAN. |
| Middle column: | Shows the update direction. |
| Right column: | Displays the value in Teamcenter. |
By default, the columns that display the changed values after the adjustment process are hidden. To display them, click  and select EPLAN New and Teamcenter New.
The same color codes as above are used to indicate changes in the attributes.
2.2.5 Menu bar
The menu bar is part of all module dialogs and contains the entries Modules and Help.

Menu: Modules
| Show Log: | Opens the log file of the current module. |
| Open Log Folder: | Opens the log folder in Windows Explorer. This folder contains all log and temporary files. |
| Log level: | Sets the protocol level for the current module. The protocol level for future module runs is set in the IVS settings. |
| Exit: | Closes the module dialog. |
Menu: Help
| About: | Displays the application and connector version. |
| Report Problem: | Creates a report with all log files for XPLM support. |
2.2.6 Event log
The event log is part of all module dialogs and shows the progress of the current module.
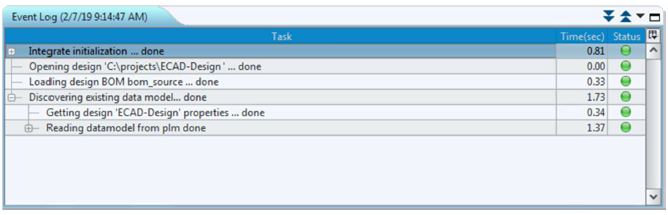
By default, module dialogs of successfully completed modules are closed automatically. You can change this behavior in the IVS settings so that the module dialog remains open.
The status icons indicate the execution of the module:
- Green: No problems
- Orange: Warning
- Red: Error
If the module was terminated with errors, all other control elements except the menu bar are deactivated. In this case the following actions may be helpful:
- Modules > Show Log: Opens the log file of the current module.
- Help > Report Problem: Opens a dialog to create a log report.
2.2.7 Integration Visualization Server
The Integration Visualization Server (IVS) stores common settings for all modules and logs information about previous module runs. IVS starts automatically when a module is executed and continues to run in the background.
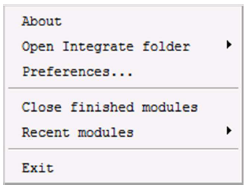
IVS menu
The IVS icon is located in the Windows notification area. Right-click the icon to open the IVS menu:
| Subscription | Displays the IVS version. |
| Open Integrate folder: | Opens the directories INTEGRATE_HOME or INTEGRATE_PRODUCT_HOME . |
| Preferences > Runtime preferences | |
| Remove log files after this number of days: | Defines how long logs are stored in the log directory %TEMP%\integrate . |
| Show this number of recent modules: | Limits the number of functions in the Recent Functions menu. |
| Log files location: | Defines the path of the log directory. The path is read from the internal variable INTEGRATE_TEMP_DIR , but you can change it here. |
| Preferences > Modules preferences | |
| Log Level | →Default: Corresponds to the value in the INTEGRATE_DEBUG environment variable. →Warning: Logs errors and warnings. →Normal: Logs errors, warnings, and brief information. →Debug: Logs errors, warnings, and detailed information. Temporary files of module runs are not deleted. →Trace: Corresponds to the highest protocol level. This setting is only used for debugging errors and should not be used in normal operation as it affects the performance of the integration. Hint: Debug and Trace are useful to analyze problems in support cases. |
| Close windows automatically when module has finished successfully: | Closes module dialogs automatically if they were executed successfully and without errors and warnings. |
| Close windows automatically when module was aborted by user: | Closes module dialogs automatically when aborted by the user. |
| Close finished modules: | Closes all closed but still open module dialogs. |
| Recent functions: | Shows the last executed modules with result and time stamp. If the cursor is moved over an entry, a context menu with further options appears. |
| Exit | Stop and close the IVS. |
Solid Edge
1. Solid Edge 2023 Update
Teamcenter Documentation
1. Overview
2. Teamcenter Basics
3. Working in Teamcenter
4. Working with CAD applications
5. Working with the structure manager
6. Workflows in Teamcenter
EPLAN - integrate2
1. Preamble
2. Function Description
3. Operating the Integration
4. Troubleshooting