User Tools
This is an old revision of the document!
Table of Contents
1st Teamcenter Integration
1.1. starting NX in multiple environments
You can now define multiple NX environments and select a specific environment to start NX. You can customize each environment to meet other requirements, such as a specific customer or supplier. The environments specify the version of NX to use and ensure that the associated data, such as dialog stores, user profiles, specific user standards are applied.
For example, you can start an NX 11.0.2 environment for a specific vendor or an NX 11.0.2 environment with a different set of user standards for another vendor or an NX 12 environment for another vendor.
To ensure that parts remain in the correct environment, you cannot store parts in the wrong environment.
You can select an NX environment from Teamcenter and then launch NX from the rich client. Alternatively, you can select the environment directly in NX Application Launcher and launch NX from there. The NX Application Launcher (NX Application Launcher) application provides an interface where you can select an NX environment, set connection options as needed, and then launch NX. You can also open a command line window (from the Application To Launch list) and launch NX from the command line.

In Teamcenter, select the NX environment in the User Settings dialog box and then start NX with that environment.
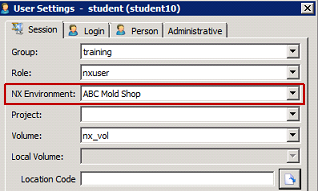
You can also use this method to launch NX if you have multiple internal projects (not vendor or custom) at your site that require different versions or configurations of NX. This method also provides an easy way to start NX with Teamcenter Integration.
To enable the NX Application Launcher feature, the .bat file and other calling program files must be set up based on the requirements at your site. To enable NX Environment selection in Teamcenter, some settings must be specified.
1.1.1 When is the function used?
You can easily start NX in other environments.
1.1.2 Where can the function be called?
| Application | Teamcenter Integration for NX |
1.2 Importing and exporting Multi-CAD
You can now import and export NX assemblies that contain JT parts as components. The imported (or exported) assembly can be a mixture of NX and JT parts.
The associativity between NX parts and JT parts is maintained so that the structural integrity of the assembly is maintained during import or export. The JT parts are imported into Teamcenter as direct model datasets and exported as JT (.jt) files in the operating system. If a JT part represents an assembly, the associated BVR information is lost during export.
When importing and exporting, most of the options available for importing NX parts can also be applied to JT parts. This excludes attribute-based numbering schemes, attribute setting, and publishing of optional information. During the import, each JT part is on a separate line in the list of elements to be imported. As with any NX part to import, you can change certain settings (such as item type).
You can also export assemblies that contain transient assembly nodes. During export, dummy placeholder parts for transient nodes are generated that essentially hold the structural information so that the exported assembly loads correctly in native NX. These dummy parts are skipped during reimport and the original assembly structure is retained.
1.2.2 Where can the function be called?
| Application | Teamcenter Integration for NX |
| Command Search | Import Assembly into Teamcenter  |
Export assembly outside Teamcenter  |
1.3. addition of element numbering rules
You can add numbering rules when you assign an item ID to a new item. This allows you to provide additional methods for assigning element IDs and customizing the format for these IDs. The numbering rules are generated in Teamcenter.
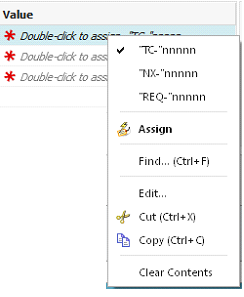
In the New Item dialog box, in the Value cell, the format of the numbering rule is added at the end of the default text Double-click to perform the assignment.

You can right-click on the Value cell and display multiple numbering rules if more rules are available. This option has been added to the default options Assign, Edit, Copy, and so on. You can select one of the other rules and double-click it if you want to apply this numbering rule. Once an item has been assigned a value, it cannot be changed.
1.3.1 When is the function used?
You can better control the way element IDs are assigned.
1.3.2 Where can the function be called?
| Application | Teamcenter Integration for NX |
| Command Search | File → New → Element |
1.4 Hierarchical value lists
LOVs are created and defined for properties in Teamcenter. You can now view hierarchical LOVs and add new LOV values for attributes without having to open Teamcenter.
1.4.1 Displaying LoVs
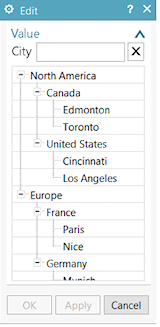
When you display the properties for a part, you can now display a hierarchical value list (LOV) on the Attributes tab page. A hierarchical LOV contains values that each have their own LOV.
The Interaction Method must be set to Traditional to get the correct view, and the attribute you select must contain a hierarchical LOV. The LOV values are listed at the bottom of the dialog box.

1.4.2 Selecting and Adding LoV Values
If you use the Bulk Edit view on the Attributes tab, you can double-click an attribute with hierarchical LOV values or right-click the attribute and select Edit to select a value from the available values. You can also enter a new value that is not in the list.
Dependent LOVs and dynamic LOVs are also supported. For dependent LOV values, changing an LOV value of a lower level changes an LOV value of a higher level. The selection list displays the grouped LOV values that are dependent on the top level. Dynamic LOVs retrieve the associated values by querying an attribute. If the query changes, the LOV also changes.
If a query that contains dynamic LOV values is saved and used in Advanced Search, the LOV values are also included as attributes that you can use in the search.
1.4.3 Where can the function be called?
| Application | Teamcenter Integration for NX |
| Assembly Navigator | Right-click a component and select Properties. |
| position in dialog window | dialog window component properties → tab attributes |
1.5. Precise structure for assemblies
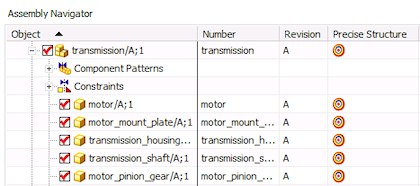
You can now easily view and accurately identify assemblies in the Assembly Navigator. Therefore, the Save Precise Assembly command has been removed.
If an assembly is not precise, you can right-click the assembly in the Assembly Navigator and select Set Precise on Save. The Precise Structure column displays the Precise State Modified icon  for the assembly and all associated components. This informs you that the current component change status is set to “Precise” when the assembly is saved in Teamcenter.

When you view an assembly that is loaded as precisely loaded, the Assembly Navigator displays the  icon for the assembly and each associated component in the Precise Structure column of the Assembly Navigator.
Since you can now specify an assembly as precise in the Assembly Navigator, the Save Precise Assembly command has been removed.
1.5.1 When is this function used?
In NX, you can easily view and define assemblies as precise without having to call Teamcenter.
1.5.2 Where can this function be called?
| Application | Teamcenter Integration for NX | |
*Navigator |Assembly navigator |
1.6. Relationship browser with improved performance
In the event that Teamcenter Integration for NX is used, the performance of the Relations Browser has been improved when you have connections to product interfaces.
When you open the Relations Browser for the first time, the status “Obsolete” can be determined for connections without having to query all product interface and connection information in Teamcenter. In earlier versions, all product interface information must be queried to get the exact status of connections to an unloaded part. For parts with many product interfaces and associated form elements, this extension provides a significant performance improvement.
You can also display all product interfaces and related form elements as follows:
By clicking the Product Interface button to display product interface information on the Product Interfaces tab.
Right-click on the part and select the new Show Links command to display the associated form elements on the Relations tab.
Status icons are added to the child part (target part) to indicate the relationship status, for example:
1.6.1 When is this function used?Performance has been improved when you query part relationships in the Relations Browser. 1.6.2 Where can this function be called?|@palegrey: Application |Teamcenter Integration for NX | |@palegrey: command search |relationship browser | |
1.7. Using Native NX Parts with Teamcenter Parts
You can load and use unmanaged native NX parts with managed NX parts in the same NX session. This allows you to add native NX parts to a design and evaluate these parts before adding them to your Teamcenter database. For example, you can use the unmanaged parts to perform operations on the managed parts, such as visualization, clearance (safety plane), measurements, and so on.
The managed NX parts are in the Teamcenter database, and the native NX parts are added to the session, but not imported into the database. The parts are present simultaneously during your NX session. The native NX parts contain all their properties and geometry and you can work with the parts. However, you cannot save the unmanaged native NX parts in Teamcenter, nor can you save any changes you have made to the native NX parts back to the operating system.
In addition, you cannot retain associative references between unmanaged and managed parts, such as WAVE references or expressions. It is therefore recommended that you do not create associative references between managed and unmanaged parts.
If a managed assembly contains unmanaged parts as child items, the managed assembly cannot be saved in Teamcenter.
You can load unmanaged parts using the Open Unmanaged Part command.
You can also add (load) unmanaged parts to an assembly by selecting Open Unmanaged Part in the Add Component dialog box.
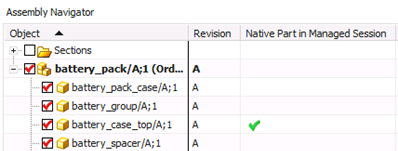
In the Assembly Navigator, a Native Part in Managed Session column is added to identify the native NX parts loaded for an assembly.
1.7.1 Where can this function be called?|@palegrey: Application |Teamcenter Integration for NX | |@palegrey: Command Search | Open unmanaged part |
|@palegrey: Menu bar | Tab File → Open unmanaged part | |
|@palegrey: Menu bar | Tab File → Open unmanaged part |
1.8. Utilities for the management of part dataThe new part_utility utility is a command line utility with options specifically related to part data configuration, structure, geometry, and completeness. You can run the utility regardless of whether you are using native NX or Teamcenter integration. For example, you can perform the following tasks: * Clean up the part. * Creating drawing snapshots * Removal of user and program entries from the part history * Convert obsolete line widths to new line widths * Update an assembly structure to reflect changes to sub-assemblies. * Convert mating conditions to assembly constraint conditions * New generation of lightweight bodies * Processing of components that are not up-to-date with the current version * Synchronization of structures and arrangement data between NX and Teamcenter * Capture part data, including properties, bounding box, and volume analysis, to enable Active Workspace to filter search results by advanced criteria * Reassign callout references in the drawing to an attribute name variable * Updating the search number (Find No.) in Teamcenter * Convert a portion of inches to millimeters or millimeters to inches * Recording of AltRep position notes * Specify the customer environment for the part. * Recreate any missing allowance as a component for routing assemblies 1.8.1 When is this function used?You can perform operations from the command line for one part or for many parts simultaneously. 1.8.2 Where can this function be called?|@palegrey: | Application |Command line in native NX or Teamcenter integration | |@palegrey: |Position** | NX Installation in <UGII_BASE_DIR>\NXBIN> |

 → Updated
  → Obsolete
  → Status cannot be determined because the information is not available. In this case, you must upgrade the part to NX 12.0.1.
Solid Edge
1. Solid Edge 2023 Update
Teamcenter Documentation
1. Overview
2. Teamcenter Basics
3. Working in Teamcenter
4. Working with CAD applications
5. Working with the structure manager
6. Workflows in Teamcenter
EPLAN - integrate2
1. Preamble
2. Function Description
3. Operating the Integration
4. Troubleshooting