User Tools
Table of Contents
3. Working in Teamcenter
3.1. topics overview
This training document deals with working in Teamcenter.
The main focuses have been set as follows:
- Working with data types
- Working with Items & Revisions
- Searches
- Check in / Check out
- Structure Manager
- Workflows
3.2 Working with data types
3.2.1 Basic Teamcenter data types
There are different types of data types in Teamcenter. A dataset is the connection to the file located in the secure area.

| Symbol | Description |
|---|---|
 | Item or “FFG Engineering Item” |
 | Item Revision or “FFG Engineering Item Revision” |
 | assembly structure in folder form |
 | UGMASTER Dataset (NX 3D model) |
 | UGPART Dataset (NX 2D drawing) |
 | BOM View (at Item) |
 | BOM View Revision (at the Item Revision) |
3.2.2 Items & Revisions
In Teamcenter a part is called an “Item” (English) or an “Element” (German). There can be different types of Items, which can have different business rules, attributes, permissions, symbols etc. In this project the item type “FFG Engineering Item” was introduced for FFG, marked by a blue icon. This type contains, for example, the rules for assigning the item ID in the form “X.nnnn.nnnn” or “T.nnnn.nnnn”.
All geometric and non-geometric parts are mapped as item type “FFG Engineering Item”.
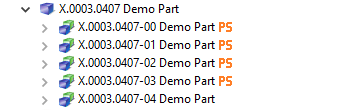
The item contains those properties that are the same and must be the same across all revisions, such as the part number (Item ID). The item always has at least one first revision (revision 00 for FFG). Further revisions (01, 02, …) can be created as soon as the last revision has been released and has been given a status.
When “expanding” an item in the Navigator, all revisions are always displayed.
3.2.3 BOM Views and BOM View Revisionen
In Teamcenter structures (“BOM”) are stored in a separate object, the so-called “BOM View” or “BOM View Revision”. If an item has a BOM View, then it is generally an assembly, otherwise it is an individual part or component.
The BOM View revisions are attached to the revisions and contain the BOM configuration for that revision. The “BOM View” is attached to the Item and points to the most recent (current) “BOM View Revision”.
Assemblies are created using the CAD tool “NX” in Teamcenter. It is important to note that NX internally stores its own assembly information in the part file and this information must always match the information in Teamcenter.
Alert:
Improper editing of structures in Teamcenter can lead to the fact that an assembly can no longer be loaded correctly in NX.
3.3. Check-In / Check-Out
3.3.1 Basics for checking in and out
You can check items in and out of Teamcenter while maintaining exclusive access permissions so that other users cannot make changes to the data.
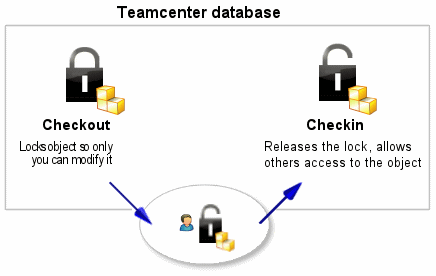
- The check out option locks an item in Teamcenter so that only you can change it. However, other users can still view the item.
- Checking in unlocks the item so that other users can access it.
3.3.2 Checking out a construction
Before you make any changes to your design, you must first check it out. This locks the element and prevents other users from making changes at the same time.
- Select the element you want to update.
- Click Checkout on the toolbar
 .
.
The Information window displays the object whose property Checked out is set to Y.
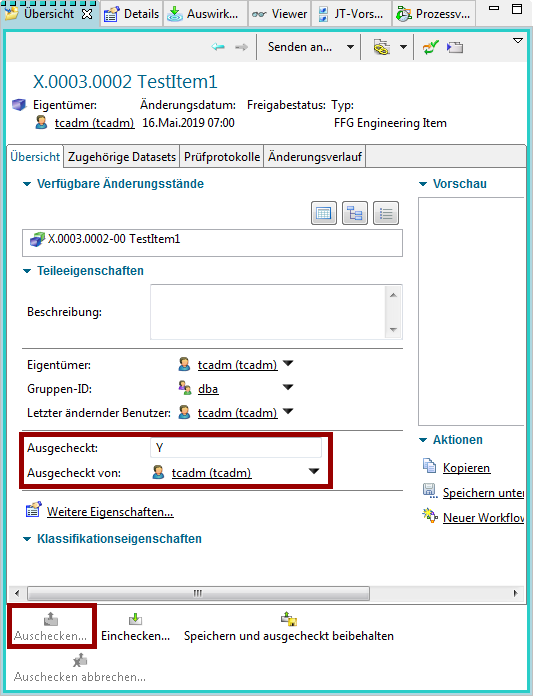
Now you can open the element and make changes.
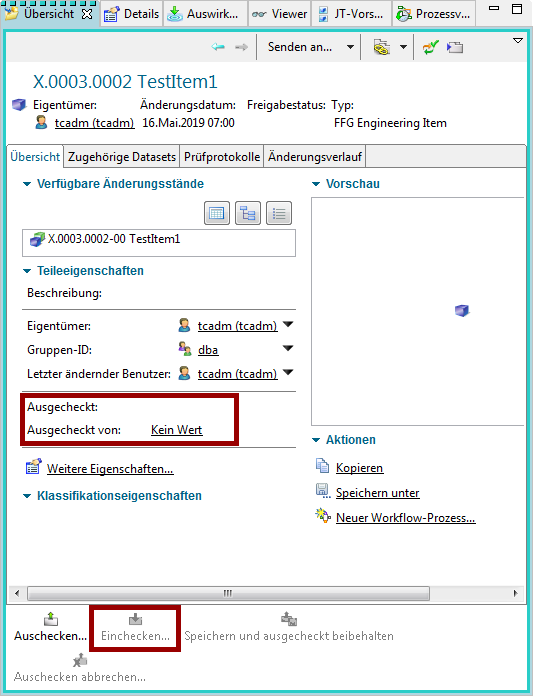
If you have made a change to your design, you must then check it in. This unlocks the element so that it can be checked out and changed by other users.
- Select the item you want to check in.
- Click Check in on the toolbar
 .
.
The property Checked out is updated
Info:
Please note that before releasing an item revision it must be completely checked in.
3.4 Working with Items & Revisions
3.4.1 Basics
In Teamcenter parts are called “Items” or “Item Revisions”. The item is a kind of “bracket” which summarizes the revisions. An item always has at least one revision. The item number (Item ID) is assigned when the item is created and then inherited by all revisions, i.e. the Item ID of all revisions is always the same. Normally an assigned Item ID cannot be changed in the normal way.
The item also contains properties (attributes) which must be the same for all revisions, e.g. the unit of measurement.
Alert:
Especially when SAP is used, this must never change in one part and must not differ in the revisions.
The name of the revisions can change, usually the item is named after the first revision. For FFG, the item name is identical to the name of the last revision. However, the item name has no meaning from a procedural point of view.
3.4.2 Exercise 1 - Creating a part in Teamcenter
In Teamcenter you can create a part as follows:
Select “File → New → Item “.

Select “FFG Engineering Item” in the following menu. Please always use only this type of part.

Press “Next “.
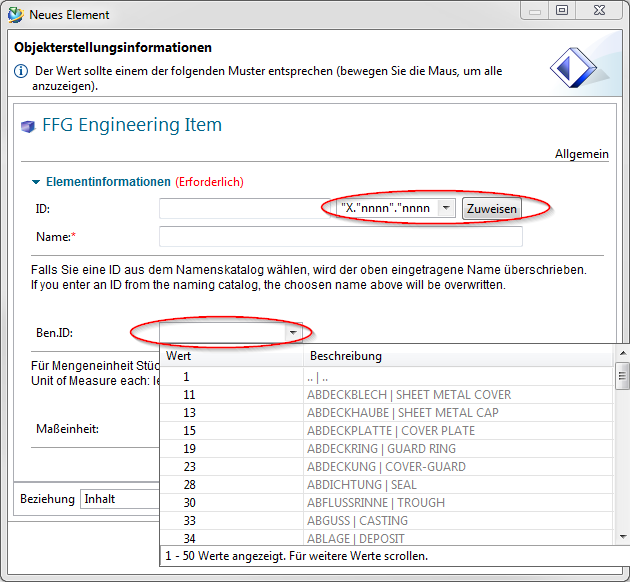
In the following dialog the properties of the item are assigned. Press “Assign “ next to the “ID” field to assign an item number.
Info:
The rule for the part number is automatically determined via your group, e.g. group “EI” always uses the format “X.nnnn.nnnn” and group “FR” the format “T.nnnn.nnnn”.
The part number is generated from a number generator and is always unique.
Enter a name of your choice. This name will later be overwritten by the name catalog.
If you click in the field “Naming Catalog ID “ and make an entry, all entries from the catalog will be displayed which contain this text in the German or English name. You can select a suitable name or ID here, the German and English names will then be entered into the Revision and Item attributes when saving.
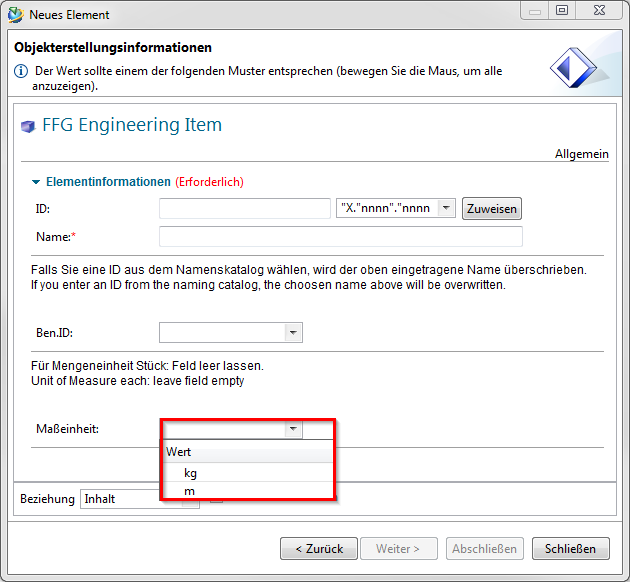
Enter a Unit of Measure.
Important
- There is no entry for “piece” or “Each” as unit of measurement in Teamcenter. For “Piece/Each” please leave the unit of measurement empty, this will be converted correctly in the SAP interface later.
- The unit of measurement cannot be changed once the part is released or already installed.
- The unit of measurement “piece/each” has a special technical meaning in Teamcenter, e.g. it is only possible to enter integer quantities here. Furthermore, a CAD system (here NX) always creates parts without a unit of measurement.
Press “Next “.
In this dialog you can set the mandatory attributes required for a release.

The “Overview “ tab of the revision now shows the English and German names.
Exercise:
1. create an item in Teamcenter Assign a name to the item via the name catalog.
2. check the structure of your created item in Teamcenter [Item, Item Revision]
3.4.3 Exercise 2 - Editing part information
To edit the information on revisions, select the revision in the Navigator.
The properties are displayed in the “Overview “ tab. Make sure they are also in the “Overview” tab and not in another tab.

Click on “Check out “. The revision is checked out and the tab is set to edit mode.

You can now edit the properties. You can then save your changes with “Check in “ or cancel them with “Cancel check out “.
ToDo:
1. check out the Revision item so that you can edit the attributes
2. change the name of the Revision item using the Naming Catalog.
3. fill in all mandatory attributes that are required for release.
4. check in the item Revision. Note the name of the Revision item.
3.4.4 Exercise 3 - Editing the classification
The specifications for the material group and the classification can be edited in the tab “Classification”. To enter the material group, the revision must be checked out.
Important:
Currently the entries of the product group are only implemented in English! The German translations will follow.

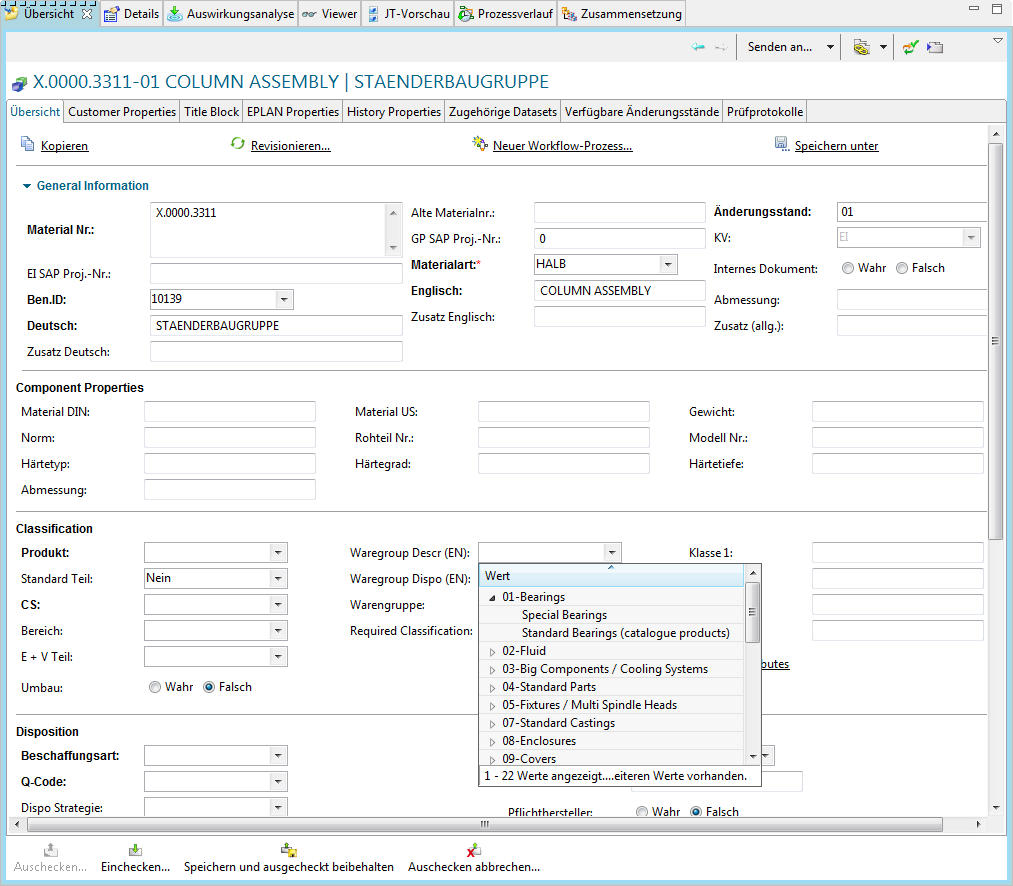
You can then enter the material group. The values of the merchandise category description are structured according to the categories.
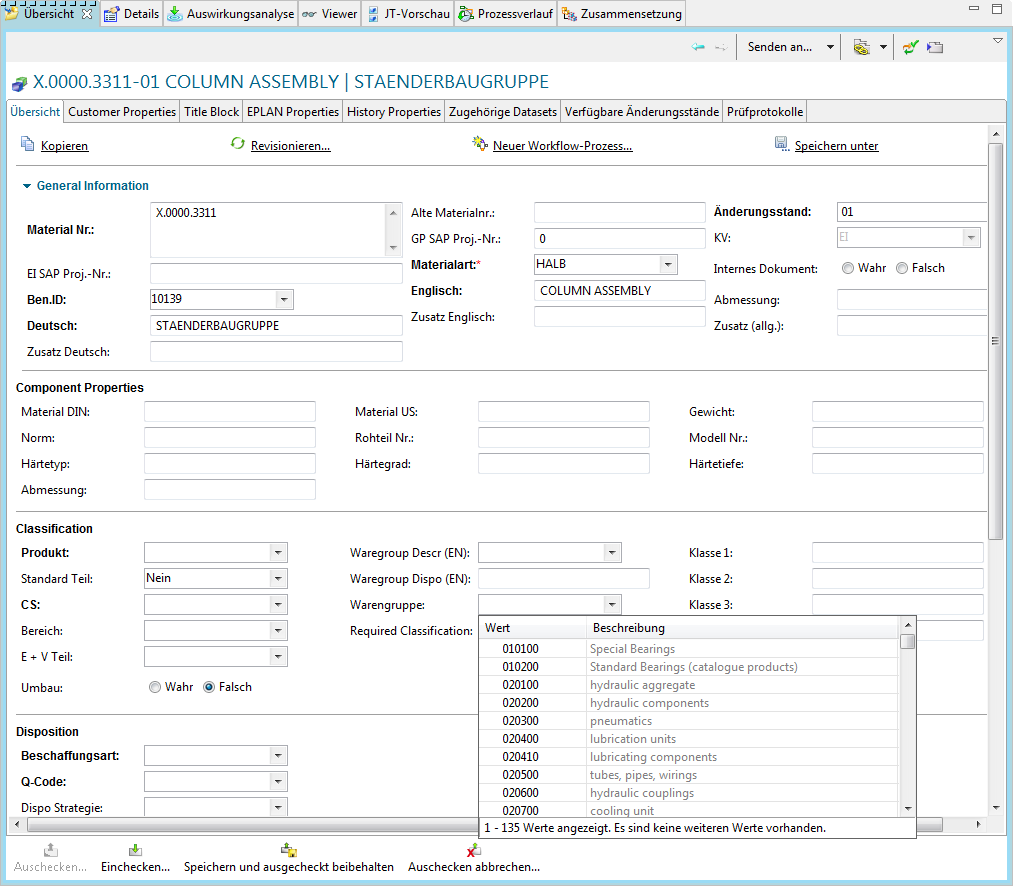
Alternatively, you can also enter the number of the material group directly if you know it. Please note that the field for the material group description must be empty for the entry in the material group field to be effective. The description has priority over the number.
Please note that the field for the category (Waregroup Dispo) is for display only and cannot be filled in.

If a classification is required, you can set it via “Set Class Attributes” (this entry is currently only displayed in English).
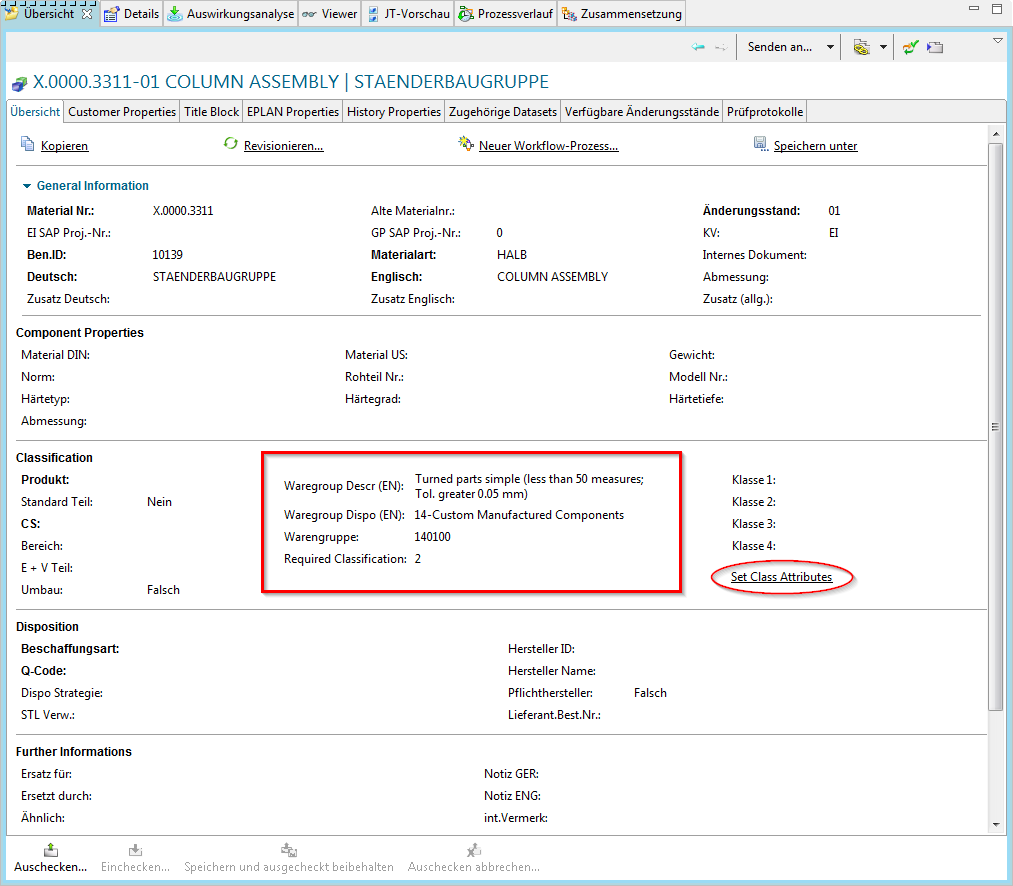
A menu opens in which the classification combinations valid for the respective material group are displayed. The values are - as in Agile - dependent on each other from left to right.
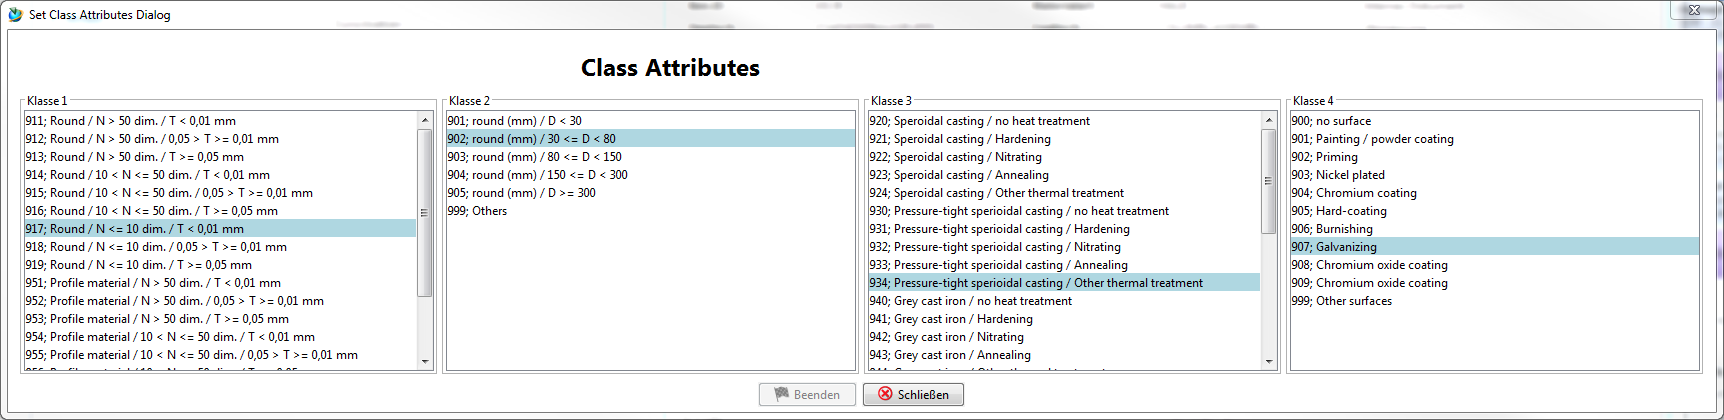
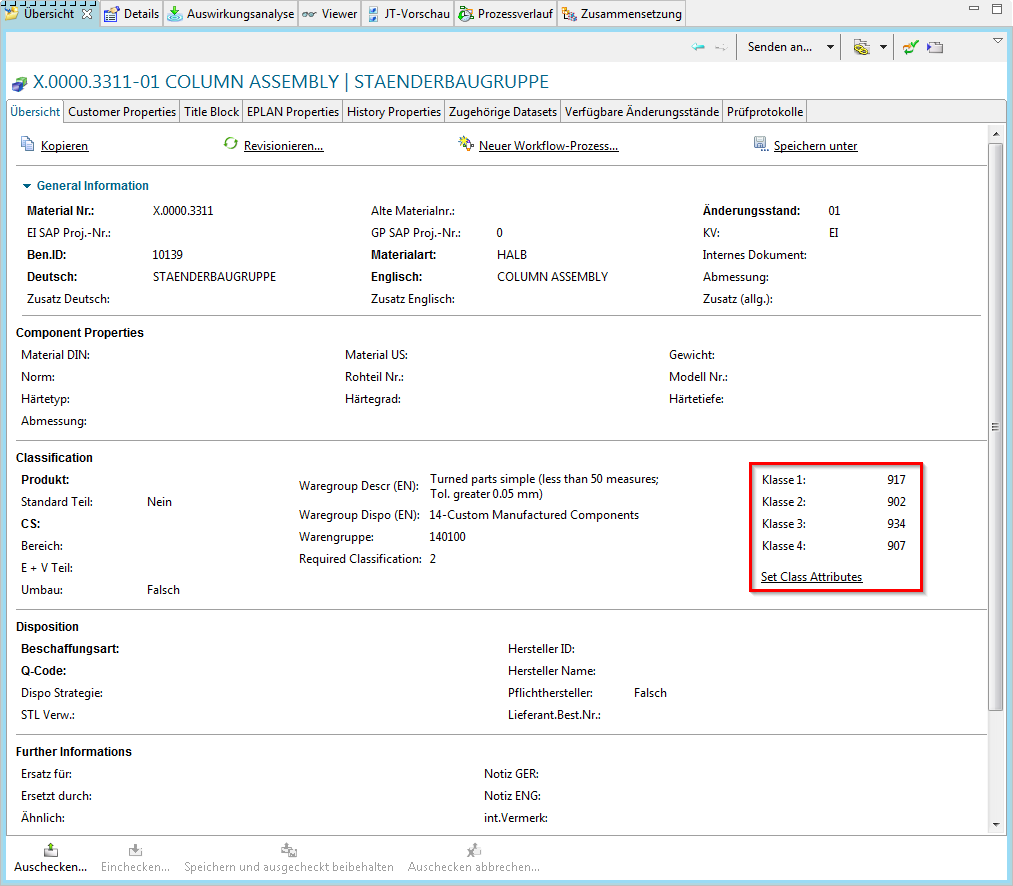
Select the required values and click on “Finish”. The classification values are written to the fields.
Exercise:
1. check out the Revision item you created and switch the tab to “Classification”.
2. assign a commodity group for your Revision item
3. check in the item revision and check the individual attribute values
4. check out the Revision item again - change the item group so that a classification is required
5. carry out the classification.
6. check in the Revision item and check the individual attribute values
3.4.5 Exercise 4 - Importing a dataset
There are two procedures for importing a dataset in Teamcenter:
1. Procedure:
Via File –> New –> Dataset the dialog window “New Dataset” opens.

| 1. | Select the required dataset type in the selection list via “More… “. |
| 2. | Import the local file from a directory. |
| 3. | Optional: Select the type of relationship or relation. |
The Item ID revision (X.nnnn.nnnn/nn) is entered in the “Name” field and does not need to be edited by you.
Confirm this with “OK “ or click on “Apply” if you want to import more datasets.
2. procedure:
Datasets can also be imported into Teamcenter via drag & drop. To do this, proceed as follows:
1. select the desired file locally on your computer and drag it under the item revision you have created - the following dialog will open:
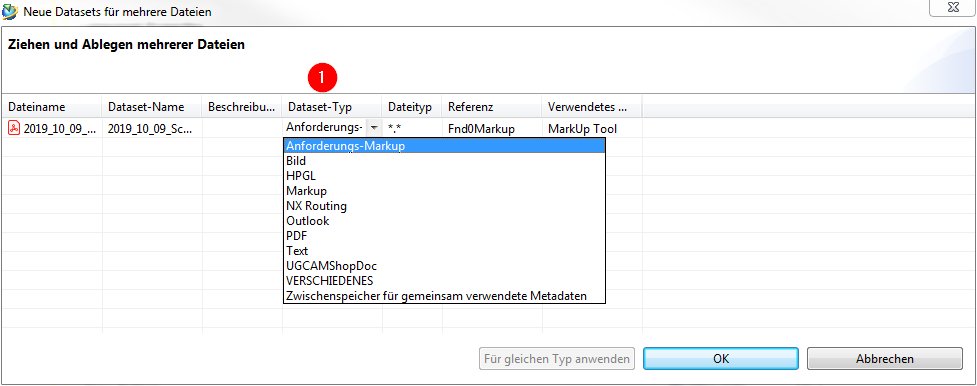
2. Now select the corresponding dataset type and confirm your entry.
Tip:
With this procedure it is also possible to import and create several datasets in Teamcenter at the same time.
Important:
It is very important to make sure to select the correct dataset type. This cannot be changed afterwards and may result in the dataset not being able to be opened.
Exercise:
1. select the Revision item you created
2. insert a new dataset via “File –> New –> Dataset” [CTRL+D]
3. add a new dataset via Drag & Drop under your item revision
4. check the structure of your created item in Teamcenter [Item, Item Revision, Dataset]
3.4.6 Exercise 5 - Cut, Copy, Paste and Delete
| Cut | Cut does not remove the object from the database, only the reference to the file. |
| Copy | Copies the reference to the data The data itself is not duplicated or copied. |
| Paste | The Paste function is the same function as in Microsoft Windows |
| Delete | Removes data from the database. |
| Drag and Drop | Drag and Drop has the same function as in Microsoft Windows |
3.4.7 Exercise 6 - Revision of parts
In a PLM system, parts are revised in order to track changes. FFG has the following basic rules for revisions:
- The revision ID is a two-digit number and begins with “00”.
- Revisioning is only possible if the predecessor has a release status. This means that changes can only be made to the last revision if it has not been released.
- It is possible to create a new revision from any revision status, e.g. revision 02 can be created from revision 00 or revision 01. In this case, the user himself must ensure that the logic is correct and that, for example, no design or content changes are overlooked.
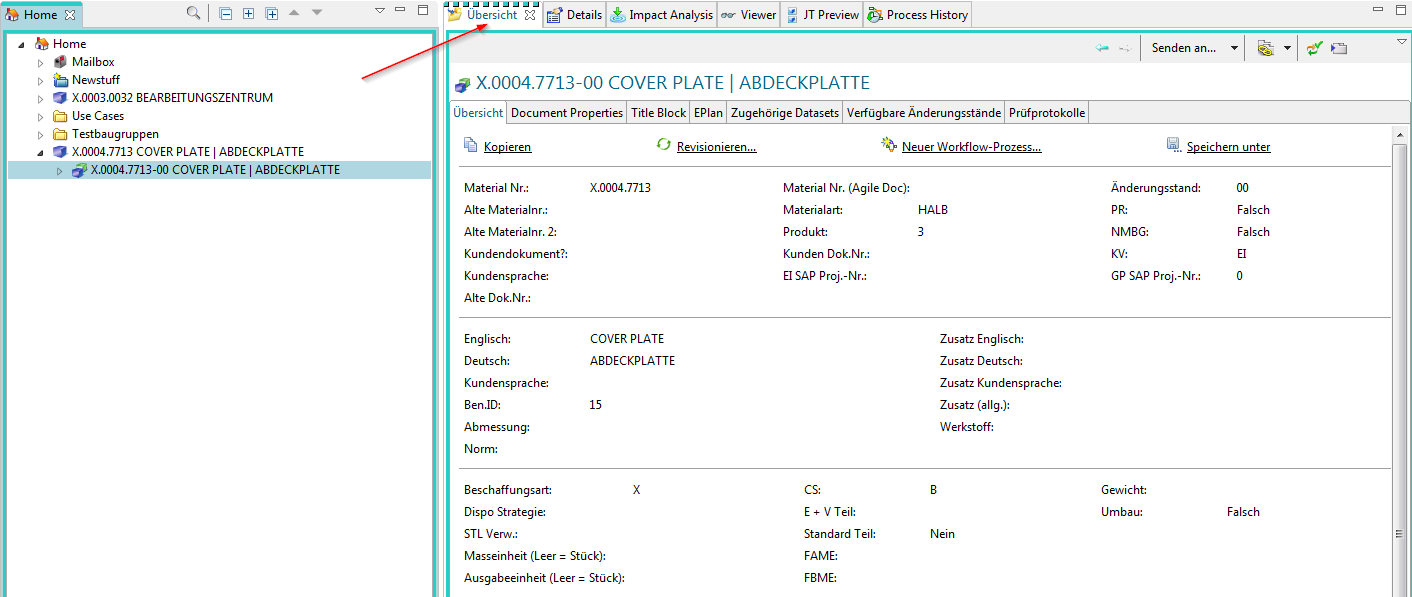
To create a new revision, select a previous revision and then select “File → Revisions… “ or perform the revisioning using the Revision item in the Overview view from the Overview tab, as shown in the screenshot below
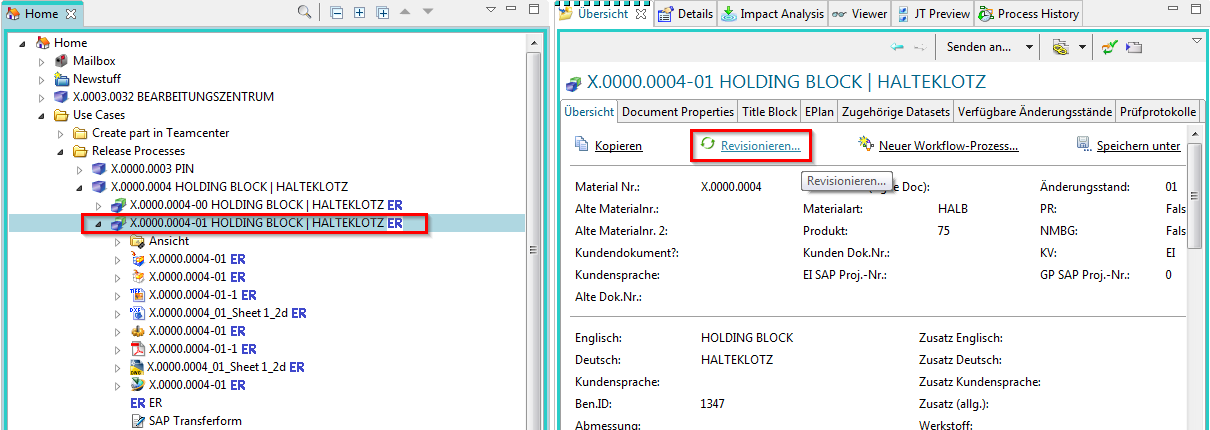
Further entries are not necessary. Press “Finish “ to complete the operation.

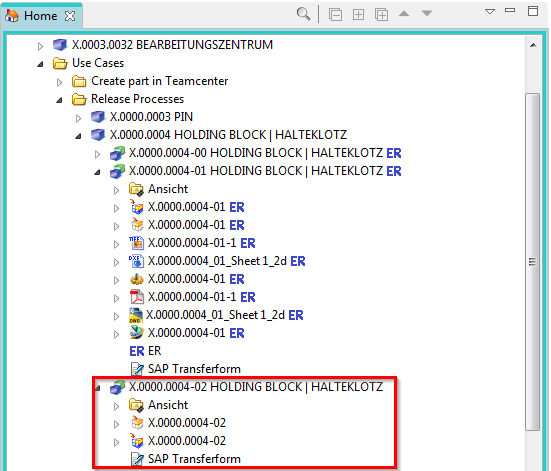
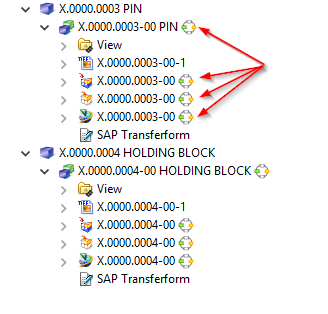
Then a second revision “01” is displayed under the item. All specifying documents like 3D model (UGMASTER) or drawing (UGPART) are copied to the new revision.
Please note that the neutral formats (Tiff, PDF etc.) are not accepted. These will be recreated on release.
Exercise: [can only be edited after 3.7 Workflows]
1. select the Revision item you have released
2. carry out a revision of the released revision
3. check the structure of the revised item
3.4.8 Exercise 7 - Impact Analysis
With the help of the impact analysis you can see in which BOMs an item revision is installed or linked everywhere. To do this, you must select an Item Revision and then select the “Impact Analysis “ view.

| 1. | The search text window and the search button. You can use the Clean button to clean up the search text field. Select the Open button to display the Open by Name dialog box, which allows you to use names, wildcards, and change state level to search for objects. |
| 2. | You can use the Where: button to filter where the object is used or referenced. |
| 3. | With the button Depth: you can set a filter whether one layer, all layers or only the main layer should be displayed. |
| 4. | Using the individual buttons, you can select whether the display should be in a horizontal, vertical or structure layout format. |
| 5. | Where-used-list/reference list |
| 6. | Enable / disable the response time to selections from other views so that the currently selected main object can be retained in the view while examining other objects in other views. |
| 7. | With Rules: you can filter by specific status. |
| 8. | Via Display objects can be… can be selected. |
| 9. | Here you can filter by Teamcenter objects. |
| 10. | Here you can filter according to different depths. |
| 11. | By selecting the button, subtypes are included. |
To open the structure step by step, always double-click on the individual nodes and the next higher structural element is displayed.
 |  |
Tip:
To display all layers immediately, select “All Layers “ in the Depth → button.
You can call up further functions using the right mouse button (RMB):
 | 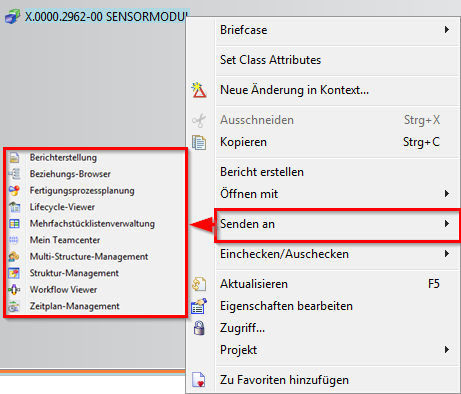 |
Exercise:
1. search for item X.0000.2962.
2. perform an impact analysis of the Revision item, where this component is installed everywhere
3. open the topmost structure element of the component and send [RMT→ Send to] this to “My Teamcenter “.
3.5. search queries
3.5.1 Search tools in Teamcenter
Request type
- Standard query
- Customer-specific query
Request execution via
- Quick search functions
- Advanced search
3.5.2 Quick search functions

| 1 | Enter term… …completely or with wildcards * (wildcards for n characters) ? (wildcards for 1 character) |
| 2 | Perform search |
| 3 | Here you can choose what to search for: –>Dataset Name –>Item ID –>Item Name –>Keyword Search –>Advanced Search |
Info:
Quick search results cannot be added to your saved searches.
3.5.3 Advanced search

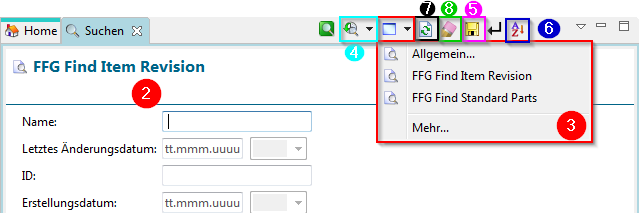
| 1 | Accessing the advanced search |
| 2 | Input of the search criterion |
| 3 | Selection of the preconfigured / defined searches |
| 4 | Calling up / selecting past searches |
| 5 | Saves the search in “my saved searches |
| 6 | Sort search result |
| 7 | Repeating the search |
| 8 | Delete all search criteria |
| 10 | The search can be executed by pressing the Enter key (ENTER). |
3.5.4 Exercise 7 - Search queries using the Quick Seach
Exercise:
1. search for a FFG Item-ID using wildcards (* and ?).
2. add this to your worklist [RMT –> Send to –> My Teamcenter]
3. search for a FFG Item Name [GER / EN] using wildcards.
4. add this to your worklist [Copy (CTRL+C]] \
3. search for a FFG Document ID using wildcards.
6. add this to your worklist [DRAG & DROP]
3.5.5 Exercise 8 - Search queries using the advanced search
Exercise:
1. use the advanced search General.. to search for an item from your colleagues in the training.
2. use the advanced search FFG Item Revision… to search for an item of your colleagues from the training.
3. search for a standard part in Teamcenter using the advanced search FFG Standard Part Revision….
3.5.6 Exercise 9 - Saving a user-specific search query
Exercise:
1. open an advanced search.
2. fill the advanced search with recurring search parameters.
3. save your preconfigured search and assign a new name.
4. close the search.
5. open “My saved searches” via the navigation window.
6. open your saved search and run it.
3.6. structure manager
3.6.1 Basics
The Structure Manager allows you to create general product structures (BOM = Bill of Material) that can be configured to display the product structure at a specific time or for a specific unit, such as
- The valid component structure of an assembly
- A specific approved manufacturing design of the product
- The current design structure in product development
- The product structure that was valid on a certain date
- A specific variant of a product
By creating a single generic structure that can then be configured to meet individual user requirements, assembly structures do not need to be duplicated. This avoids the associated problems of maintenance, redundant information and search complexity. The list is similar to the bill of materials that design departments use to list manufacturing information.
3.6.2 Opening the Structure Manager
Start the Structure Manager in the navigation window of the TC Client.

This will open the application with a new and empty window.

To open an existing BOM view revision status (BVR = BOM View Revision) in the Structure Manager, use one of the following options:
- Double-click on the parts list view (View)
| |  |
- Select the view (View) & (CTRL+O) or in the Menu File → Open * Right mouse button on selected view, item or item revision → Send to → Structure Management
| | 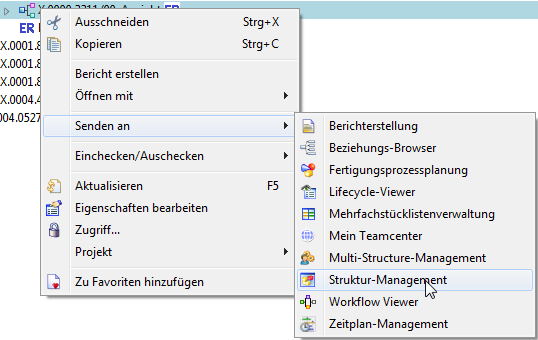 |
3.6.3 Overview of the surface

| 1. | Display of the assembly structure in the form of expandable tree diagrams in list form |
| 2. | Display of the columns can be configured as desired. |
| 3. | Usually corresponds to the design structure coming from CAD → However, components without geometry (additive, auxiliary materials, …) can also be stored here. |
3.6.4 Exercise 10 - Opening a BOM in Teamcenter Structure Manager
A structure is displayed in Teamcenter in a separate application, the “Structure Manager” or “Structure Manager” and can only be edited there.
To open a structure in the Structure Manager, double click on a “BOM View Revision” of a specific revision or select the corresponding revision and navigate to the menu item “Send to ” → “Structure Manager “ using the right mouse button.

The structure is opened, layers can be expanded or collapsed. Using RMT, all levels can be expanded - but with larger structures this can take some time.

Exercise:
1. search for the item X.1200.0057 using the Quick Search
2. open the BOM View Revision 00
by double clicking or via RMT –> Send to –> Structure Manager
3. check the BOM within the Structure Manager. Expand individual levels.
3.6.4 Exercise 11 - Editing attributes on the structure
Attributes on the structure are only visible in the Structure Manager, as these attributes are usage-dependent and not part-dependent.
For FFG, the customer-specific attributes (e.g. “SAP Position Type”) were displayed preconfigured, but each user can configure the selection of columns individually.
To edit an attribute, double-click in the column of a BOM line (that is, in a line).
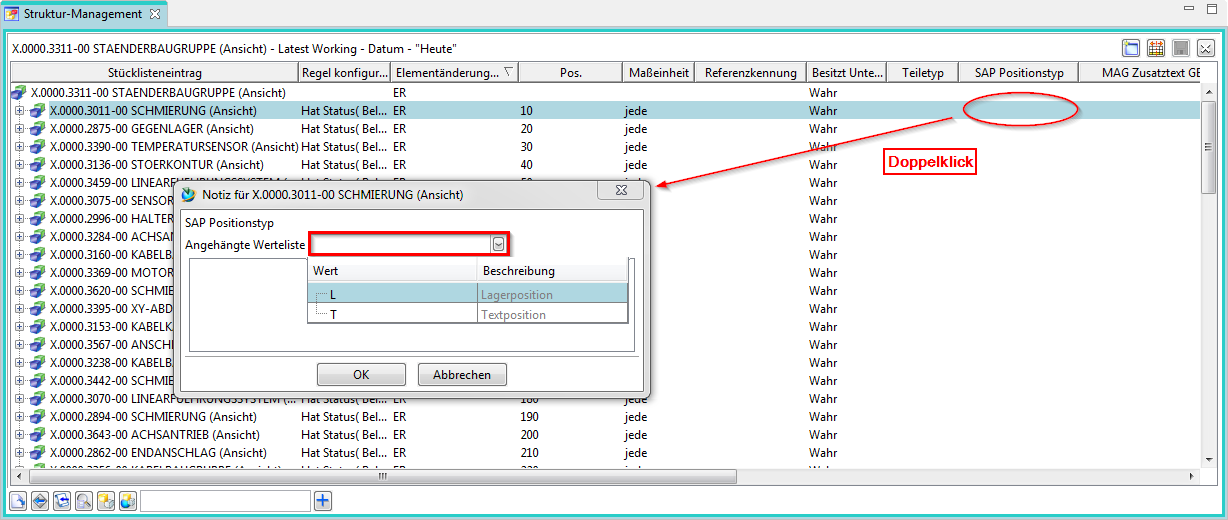
If a LOV (List of Values) is attached to the attribute, you can select a value from the drop-down menu. Then close the menu with “OK”.

The value is stored and displayed.
The second example shows how a simple value is processed without a value list, in this case the item number in the BOM. Here you also double-click on the “Find No.” column, then you can enter a value there directly and confirm it with “Enter”.

The BOM line then moves to the appropriate position in the BOM item.
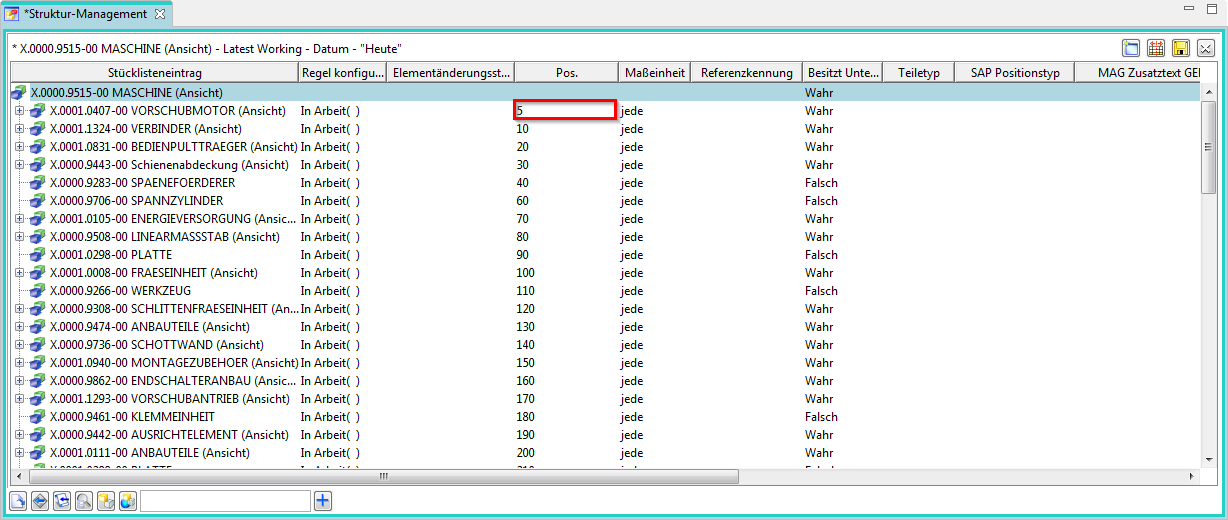
If you have made changes to the structure, these are not written directly to the database. An asterisk (*) in the tab “Structure Manager” indicates that the structure has been changed but not yet saved. You can save the changes using the “Save” button in the menu bar.

If you do not save explicitly, you will be asked which changes should be saved when you close the Structure Manager.
Exercise:
1. open a subassembly from the structure Please ask your trainer - who uses which subassembly.
2. edit the item number.
3. set a component to Geometry=No
4. change other attributes.
5. save your adjustments.
6. check the BOM in the Structure Manager
3.7. workflows
3.7.1 Basics
All objects in progress go through several processes until their completion.
- Workflow
- Sequence of processes
- Performed on 1:n Object(s)
- Process
- 1:n Activities / tasks
- Performed by different resources (e.g. users) in different roles.
- Result
- e.g. status change of objects
3.7.2 Starting a workflow

- Select the object(s) [of an item revision].
- Start process dialogue
- Process definition in the dialog window “New process “
- “FFG 01 Engineering Release”
- Process start → “OK”
3.7.3 Process indicators
- Objects that are currently in a workflow are marked as follows

- Objects that are in a workflow and you have to grant a release yourself are displayed in
 .
.
- After starting the workflow, you can enter Select the required neutral formats of all objects (part or structure) in the workflow. To do this, you must select the
 by double-clicking on it and perform a check-out. Then you can edit, save and check in the “ProcessControlForm” again.

- Then select
 “Perform Task”. Here you can now send further task instructions to the employee in the following step if you are conducting a “Peer Review”. When performing a “Self Review”, you are the final approver of the Engineering Release - then the desired neutral formats are created.
3.7.4 Exercise 12 - Performing an Engineering Release (release after "ER")
During release, certain conditions are checked without which the workflow does not start. are conditions for a design release:
- It is an object of type “FFG EngItemRevision”.
- All mandatory attributes are filled in
- The name was selected from the name catalog (name ID is set)
- For an assembly, all components of the first level must have the same or a higher release status or the components must be contained in the same release workflow.
- All revisions have no status (are in “Working”).
To make a design release, proceed as follows.
Select one or more revisions to be released. These revisions can be individual parts or assemblies.
Select File → New → Workflow Process… or press Ctrl+P on the keyboard.
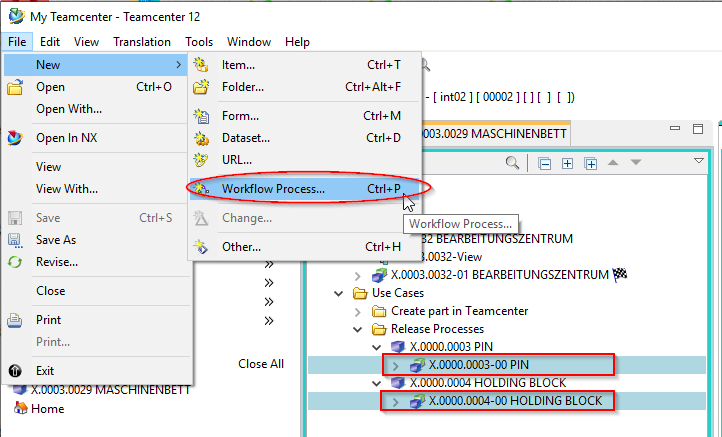
The workflow “FFG 01 Engineering Release” should already be selected. If not, select this workflow from the list of templates.
No further entries need to be made. However, it is possible to add or remove further revisions as so-called “targets” in the workflow. It is also possible to assign a different name and/or description (but this is not necessary and not common).
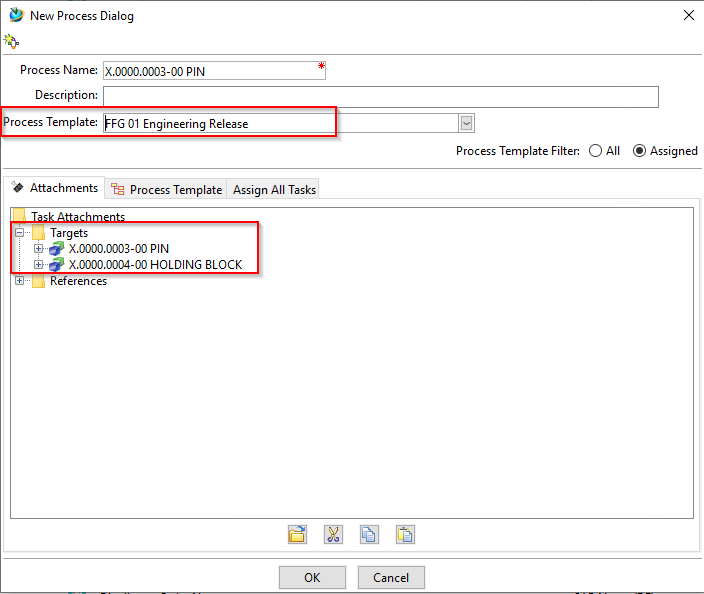
Press OK.
In Teamcenter Navigator an icon  indicates that an object is located in a workflow.
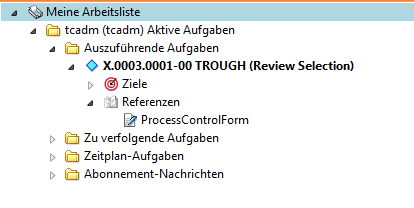
If all conditions are met, the workflow starts and you see in your inbox  in the Teamcenter Navigator under
  “Task to be executed” the started workflow. This is located in the process step “Review Selection”.
First open the “References” entry and double-click to open the “ProcessControlForm” form.
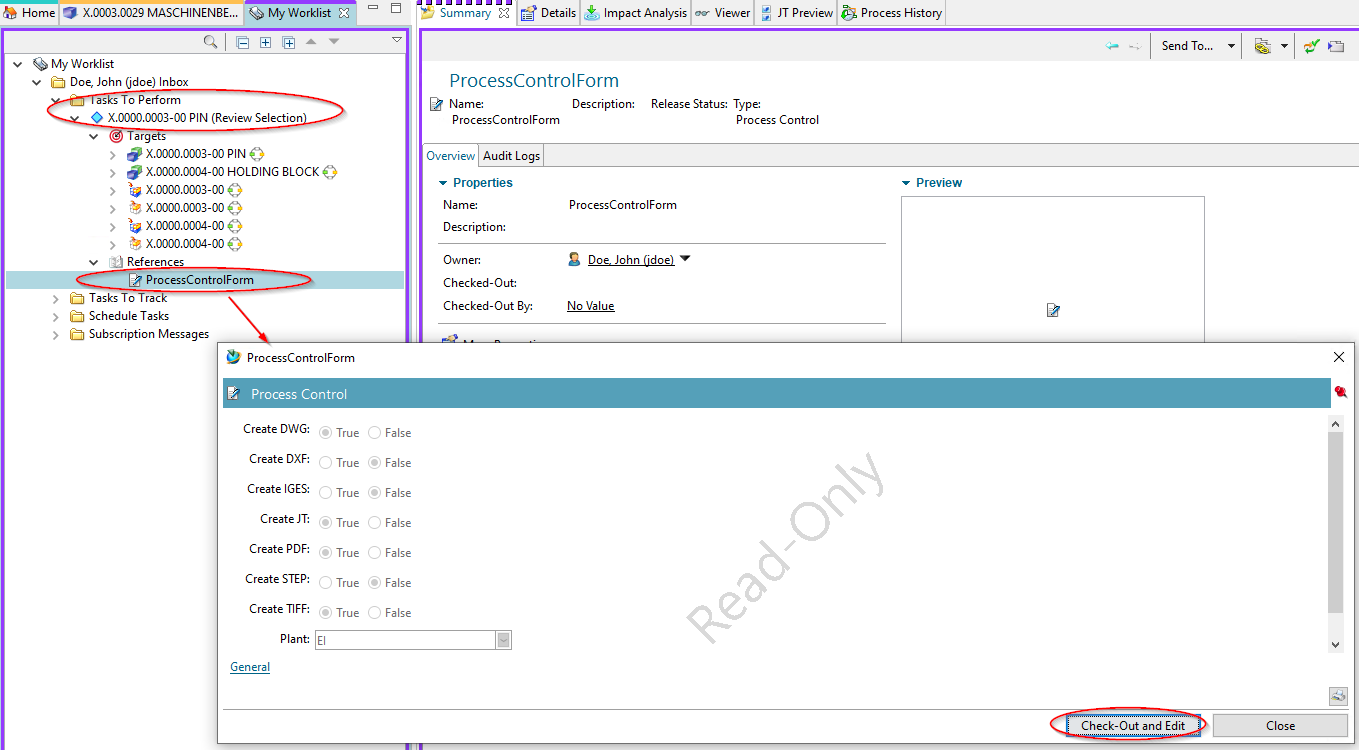
You can now select the desired neutral formats. JT and PDF are preset. If the default settings are sufficient, you can skip this step, otherwise press “Check-Out and Edit”.
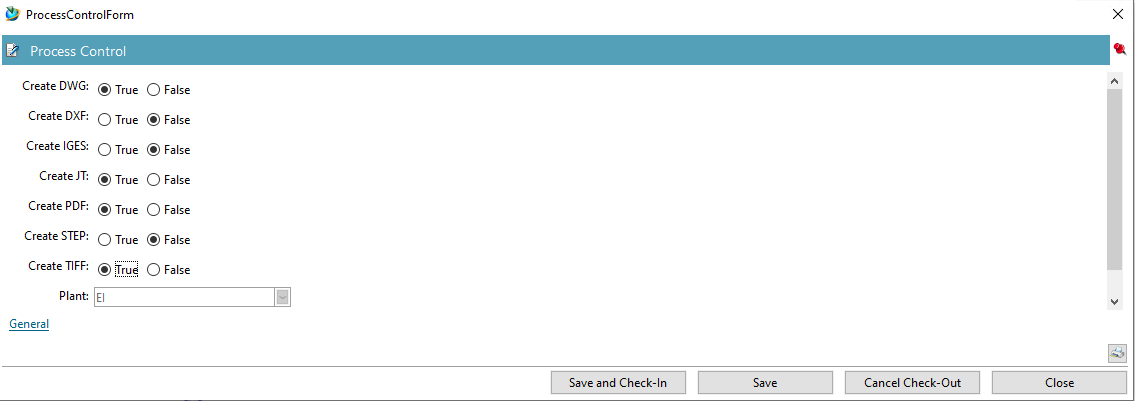
Select the neutral formats and press “Save and Check-In”. Then press “Execute Task “ in the tool bar.
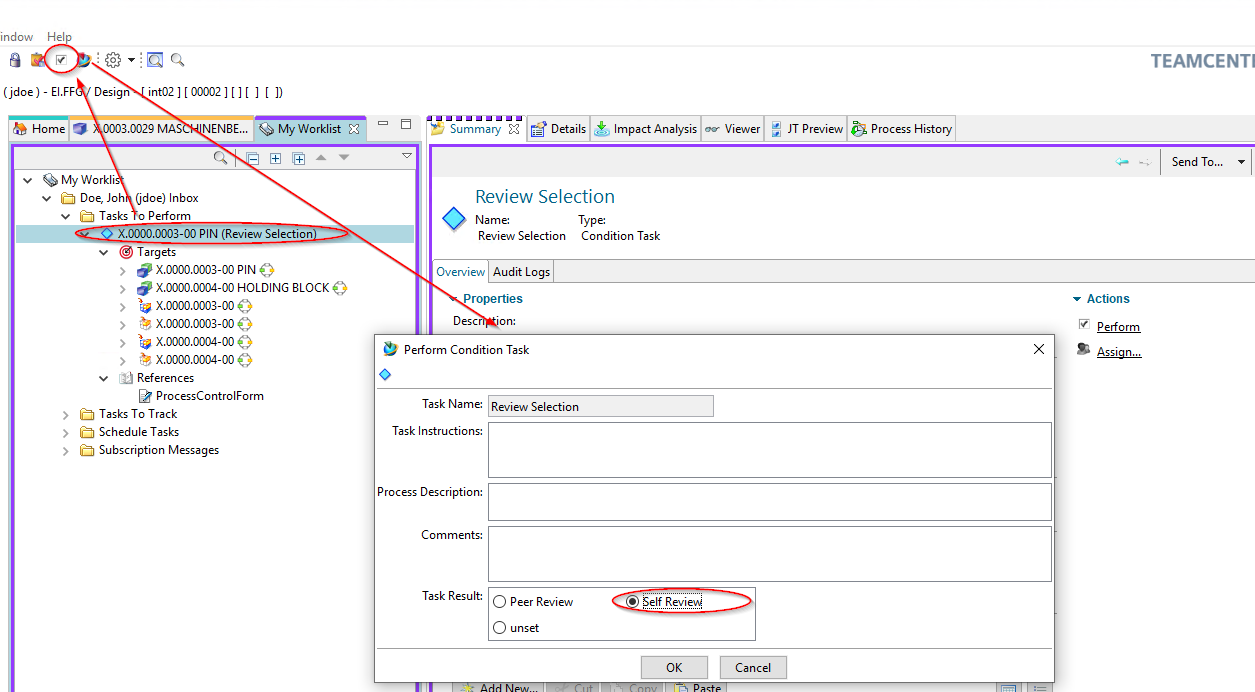
A menu opens in which you can select whether a Self Review (Self Review) or a Peer Review by another person (Peer Review) is to take place.
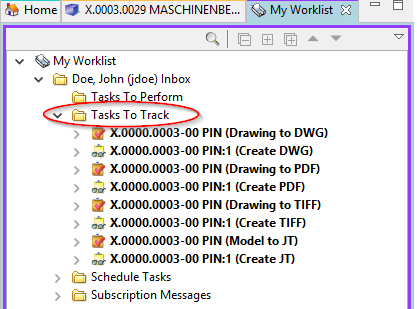
Press “Self Review “. No further steps are necessary. In the entry “Tasks to Track “ you can track the workflow or the various tasks, for example, you can see the sub-processes of neutral format generation.
In the Teamcenter Navigator an icon indicates that an object is in a workflow. This makes the object read-only, changes are not possible.
As soon as the workflow is completed, the release status (in this case “ER”) is displayed as symbol and text on the objects. In addition, the generated neutral formats are attached to the revision as a dataset and have also been released.

Exercise:
1. search for the item created in exercise 1
2. select related item revision and start a workflow.
3. in the ProcessControlForm you deselect all neutral formats to be created.
4. approve the workflow with self-review
5. check the structure of your created item in Teamcenter [Item, Item Revision, Datasets]
Now go to exercise 6 and perform a revision of your released item Revision.
Solid Edge
1. Solid Edge 2023 Update
Teamcenter Documentation
1. Overview
2. Teamcenter Basics
3. Working in Teamcenter
4. Working with CAD applications
5. Working with the structure manager
6. Workflows in Teamcenter
EPLAN - integrate2
1. Preamble
2. Function Description
3. Operating the Integration
4. Troubleshooting