User Tools
Table of Contents
2. Teamcenter Basics
2.1. topics overview
This training document deals with the elementary basics in Teamcenter.
The main focuses have been set as follows:
- User Interface
- The most important Teamcenter applications
- Organization
- Items & Revisions
- Data types
- Relations
2.2. user interface
2.2.1 Rich client interface
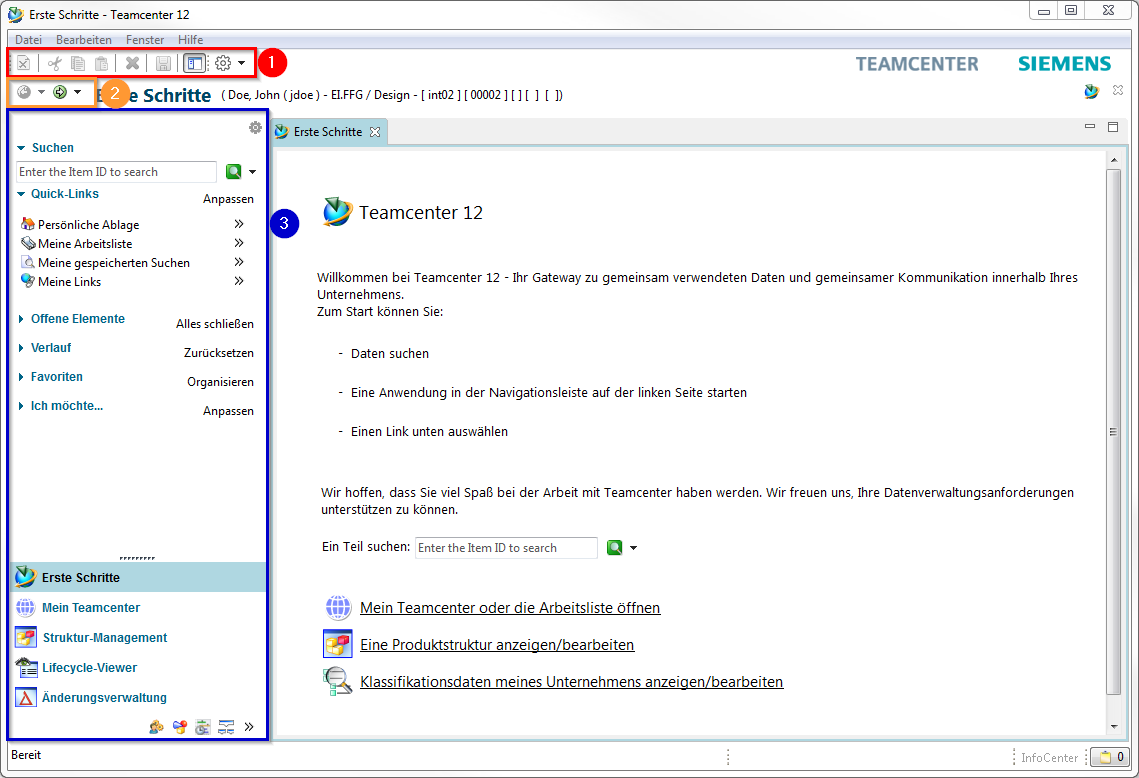
| 1. | The Menu- & Tool-Bar –> Functions of the currently displayed application. |
| 2. | The “Back” and “Forward button” allows you to navigate between open Teamcenter applications. |
| 3. | The navigation window gives you access to frequently used applications. |

| 4. | Quick Search (“Quick Search”) offers the possibility to search for datasets, item ID, item names, keywords and advanced search options. |
| 5. | Via the “Quick Links” you can jump to your personal “Home” folder, saved searches, favorites and work lists. |
| 6. | “Open elements” shows all open objects that are used in the application. |
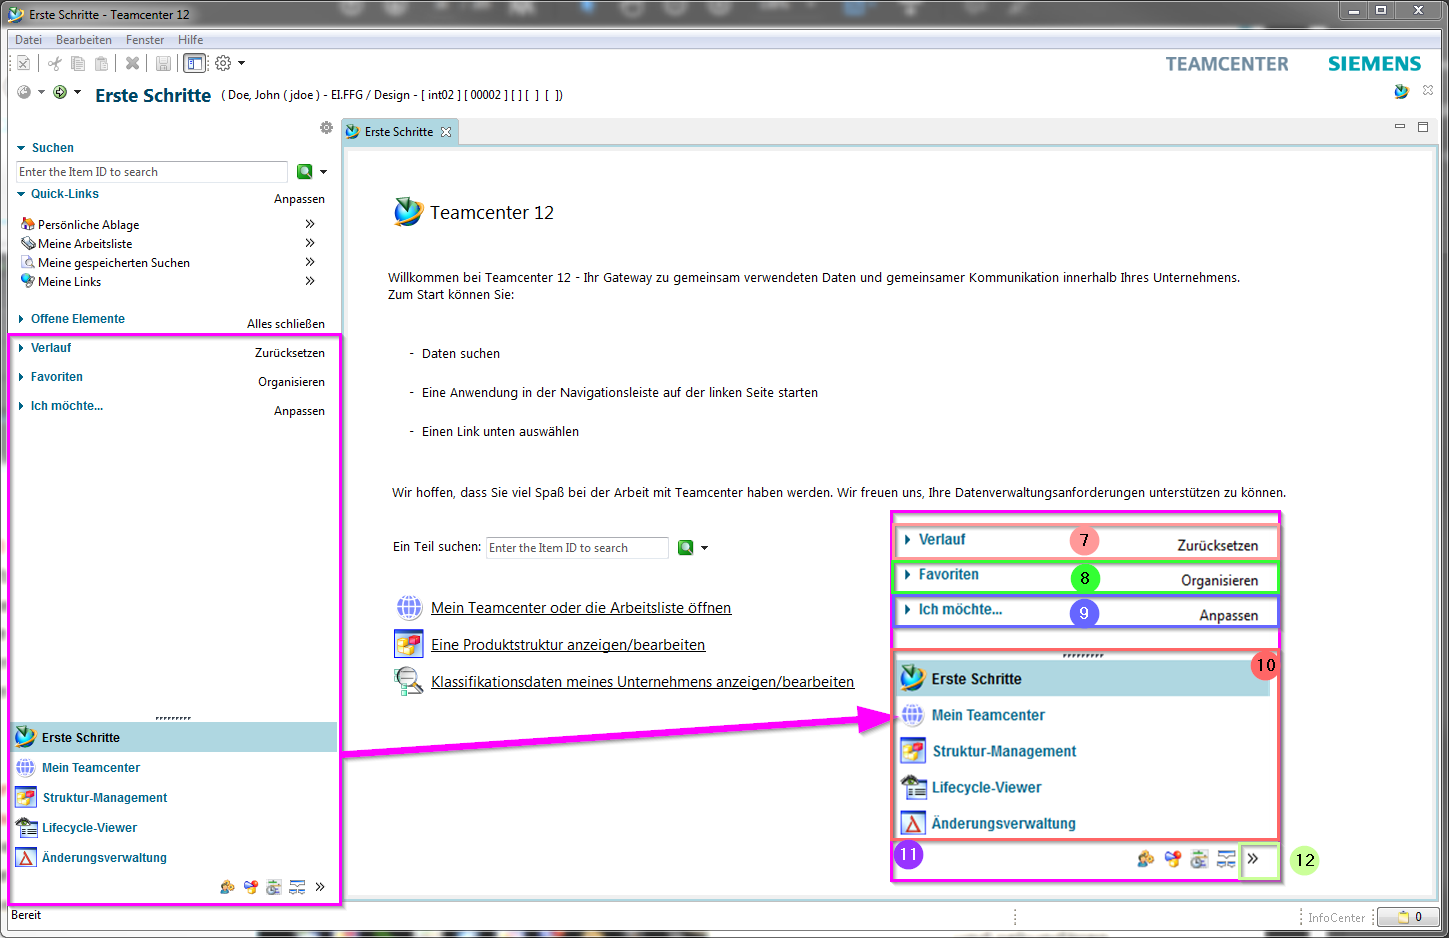
| 7. | The history shows the last opened Teamcenter application. |
| 8. | in the “Favorites” your specially marked “Teamcenter Objects” are displayed. |
| 9. | About “I want…” connections to the tools are made available, which are used repeatedly, e.g. to initiate or change processes. |
| 10. | The “Primary Application Button” opens the most frequently used Teamcenter applications. |
| 11. | The “Secondary Application button” contains applications that are used less frequently. |
| 12. | The “Configure Application button” provides access to the tools to configure the display of primary and secondary applications. |

| 13. | user settings |
| group: | |
| Responds to the KV. You can be assigned to several groups, which you can control here. Other number generators are attracted according to the group. Attention: The SAP transfer is controlled by the assignment of a group! |
|
| roll: | |
| If you are assigned to more than one role (Design-Admin, Design, Plot), you can control them using this menu. | |
| Client application: | |
| Here, for example, different NX environments (NX, NX CAM…) can be controlled. | |
| project: | |
| Corresponds to the EAC group. This must be set to 00002 after the initial login to Teamcenter. | |
| Change context: | |
| Here you can control whether you work in a change context. If you want to work in a change context, all changes and new installations are documented under the change number. |
2.2.2 Application Perspectives
Within the user interface of the Teamcenter Rich Client, the application functionality is provided by perspectives and views. Some applications use perspectives and views to rearrange the functionality. Other applications use a single perspective and views to display information.
2.2.2.1 Procedure
You can open an application perspective using the following methods:
- Click the application button in the navigation pane.
Tip
If the navigation window is not displayed, display it using the menu command Window → Navigation Window or click the Navigation Window  icon on the toolbar.
- Select the perspective from the Window menu → Open Perspective
- Select an object from the navigation view and then select an application from the Send To context menu option.
- Double-click an object in the navigation view to open the perspective associated with that object type.
For example, to open My Teamcenter in Rich Client, click My Teamcenter  in the Navigation pane.
To switch between different application perspectives, the following methods can be used:
- Use the Back button
 on the toolbar or select an open application from the
  drop down menu or press Ctrl+Shift+F8 to display the previously open application.
- Use the Forward button
 on the toolbar or select an open application from the drop down menu or press Ctrl+F8 to display the previously opened application.
- Hold Ctrl+F8 to display the Perspectives menu, then release the F8 key. Select the perspective to display using the mouse button or arrow keys.
To save the active perspective you have configured, you can proceed as follows:
- Select Window → Save Perspective As
- Enter a new name for the perspective.
- Click OK.
To reset a perspective to its default state, select Window → Reset Perspective. This restores all default views of the current perspective to their original positions.
2.2.3 View "Overview"
The Overview view allows you to view properties for a selected item and edit attributes such as name or description for supported items for which you have appropriate permissions.
Configuration and content of the View Overview vary depending on the information display configured for the selected object type.
A view can contain several tab pages.
2.2.3.1 Overview
The “Overview “ tab displays all editable metadata of an item revision. The highlighted metadata are mandatory attributes and must be filled in before release after “ER “ [Engineering Release].

2.2.3.2 Customer Properties
Customer-specific information is managed in the Customer Properties tab.

2.2.3.3 Title Block
In the Title Block tab, you can enter the information required for the drawing frame.
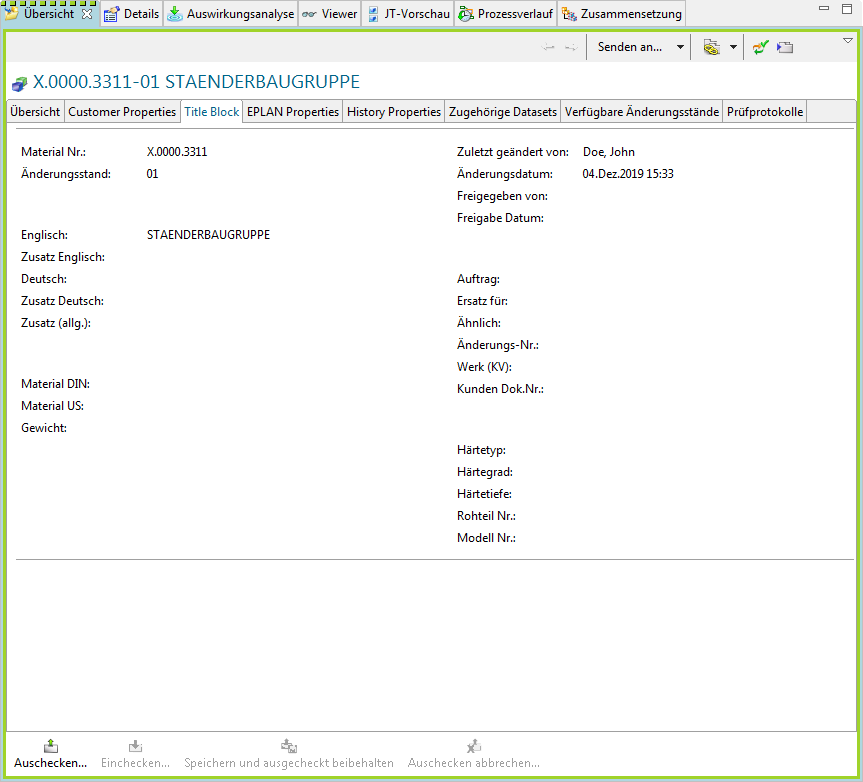
Note:
The entered metadata is transferred to the “Overview” view or from the “Overview” view to the “Title Block. This metadata does not need to be maintained twice.
2.2.3.4 EPLAN Properties
In the EPLAN Properties tab, all metadata is filled via EPLAN integration.

Note:
These cannot be edited in Teamcenter.
2.2.4 View "Details"
The Details view is a tabular display of the properties of the child elements (datasets, BOM view change status, status, SAP Transferform…) of the object currently selected in the component view.

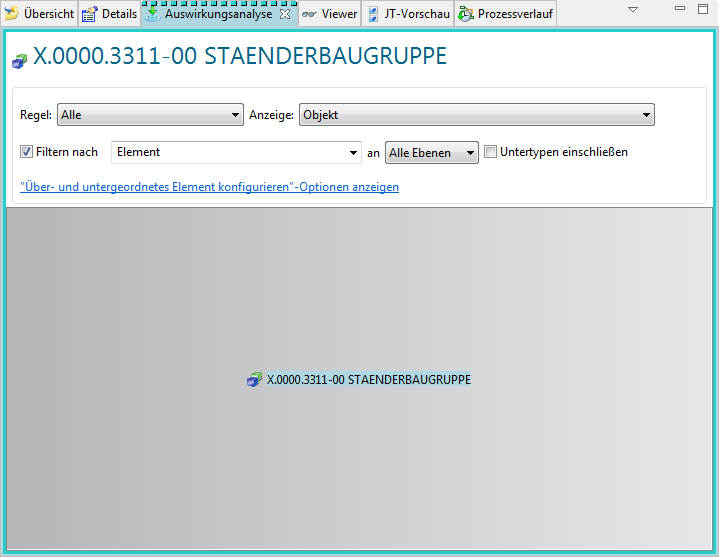
2.2.5 Impact Analysis View
The Impact Analysis view responds to the current selection in the active component view and graphically displays the relationship to the objects where it is used or referenced, and displays it in one layer, all layers, or just the main layer.
2.2.6 View "Viewer"
The content of the Viewer view depends on the selected object type in the current component or detail view. For example, if you select an Office dataset or an added link, it will be displayed in the “Viewer” view.

2.2.7 View "JT Preview"
If a revision or a selected node has a JT dataset associated with it, it is displayed in the JT Preview view.

Note:
Modules can only be displayed via the LifecycleViewer. No assembly JT is generated, since the UGMaster does not contain any geometry.
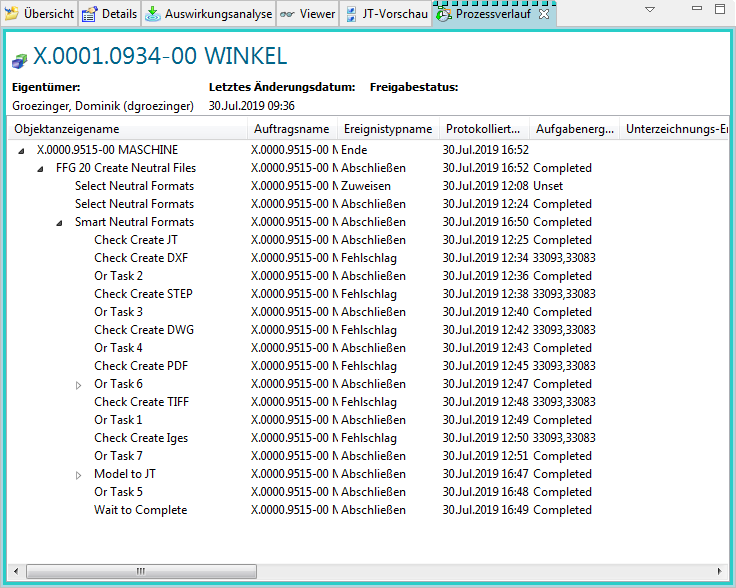
2.2.8 View "Process history"
The Process History view displays the workflow or schedule management process of the business object selected in My Teamcenter on the Home page or in the My Worklist or Search Results views.
2.3. the most important Teamcenter applications
2.3.1 My Teamcenter
The application perspective “My Teamcenter” is the workspace for using and managing product information (articles, documents, parts lists, specifications, requirements…).
This is the starting point for many standard functions such as
- Search and find PDM data
- Create and modify PDM objects
- Check-in / check-out of objects
- Managing my tasks
- Starting and monitoring processes / workflows
- Executing queries
2.3.2 Structure Manager
The Structure Manager allows you to create general product structures (BOM = Bill of Material) that can be configured to display the product structure at a specific time or for a specific unit, such as
- The valid component structure of an assembly
- A specific approved manufacturing design of the product
- The current design structure in product development
- The product structure that was valid on a certain date
- A specific variant of a product
2.3.2.1 User Interface

| 1. | The structure navigation tree enables you to navigate in the product structure and to extend or reduce the nodes to display the corresponding data. The symbols in the tree structure indicate the purpose of each node. The property columns to the right of the ID can be adapted to your requirements. |
| 2. | The data window allows you to display data for the selected entry. To display a data window, click on its tab. To do so, click Show / Hide Data Window in the Tool Bar  . . |
| 3. | The search area allows you to search for a structure to configure it with frequently used data. |
| 4. | The status icons show the current status of the selected entry. |
2.3.3 Visualization tools
2.3.3.1 Viewer
The content of the Viewer view depends on the selected object type in the current component or detail view.
The following types of datasets can be displayed in the Viewer view:
- Microsoft Office datasets
- Web links
- TIFF
- Meta data of different datasets, which were not visualized
- …
2.3.3.2 JT Viewer
If a JT dataset is assigned to an Engineering Item Revision, it is displayed in the JT Preview view.
Note:
Modules can only be displayed via the LifecycleViewer. No assembly JT is generated, since the UGMaster does not contain any geometry.
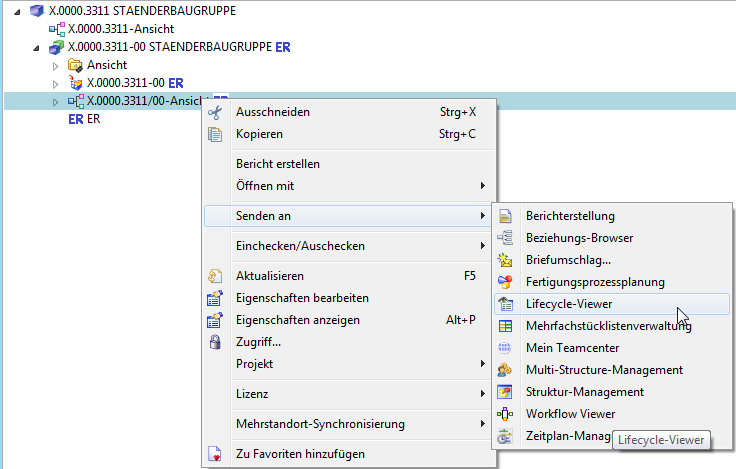
2.3.3.3 Lifecycle Viewer
To visualize the structure of the product in the Structure Manager - the Teamcenter Lifecycle Visualization Viewer must be called via the right mouse button above the BOM View  . You will find this in the selection of “Send to”.
You must then proceed as follows to visualize the product structure:
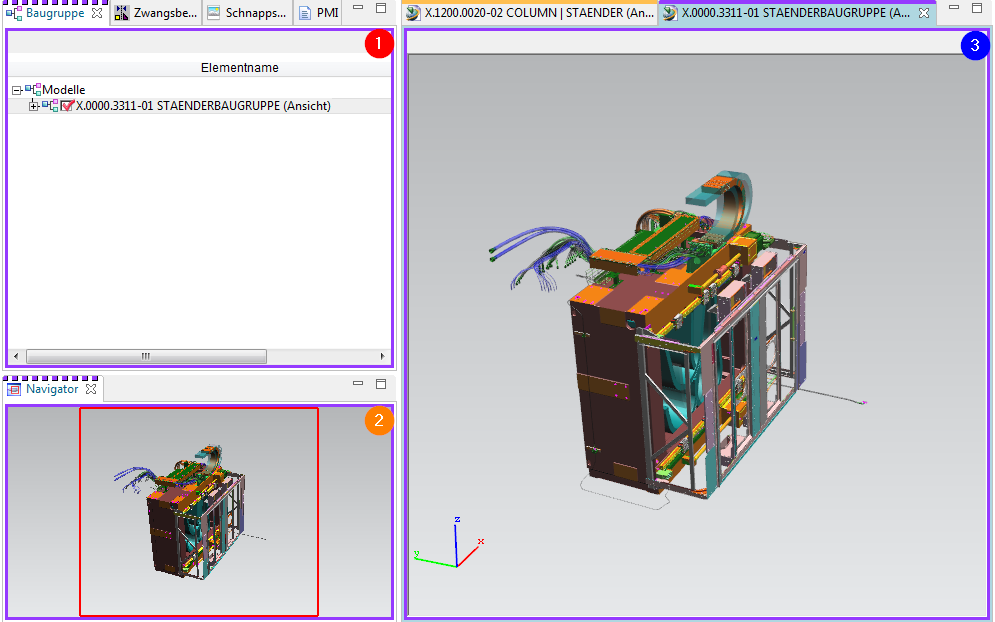
| 1. | To be able to display a structure, subassemblies or individual parts, you must activate them by left-clicking in Field. Now all item revs that have a JT are displayed. If a field is filled in green, there is no JT for this item rev. |
| 2. | After loading has been successfully completed, the structure is now displayed visually. You can add additional functions by right-clicking in the toolbar and, for example, execute measurement commands directly in the viewer. |
| 3. | Using the navigator you can enlarge a desired area. |
2.3.4 Workflow Viewer
The Workflow Viewer is used to visualize the workflow of the currently selected item. Here you can check which task the workflow is currently in.
Tip:
The Workflow Viewer can be called up as follows:
Right mouse button –> Send to –> Workflow Viewer
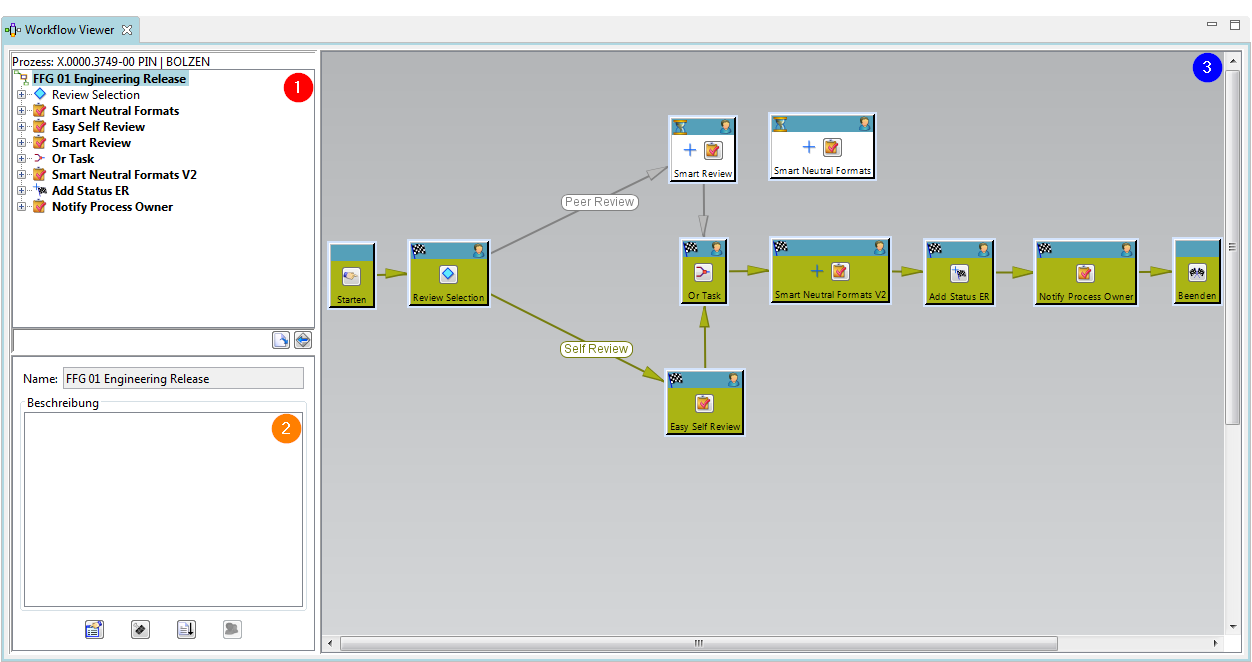
| 1. | The task hierarchy tree structure displays the workflow process at the main level, together with the associated tasks and subtasks, in a hierarchical listing. The task order in the task hierarchy tree is based on the order in which the tasks were created. |
| 2. | The Template Manager window displays the name and description of the selected process. |
| 3. | The process flow window graphically displays the various workflow process levels. You can display all tasks that exist in a workflow process, or the subtasks contained in a task, or the subtasks of subtasks, etc. |
2.3.5 Change Manager
Change management helps you track changes to a product throughout its entire life cycle. You can propose changes to a product and manage the entire cycle of review, approval, and implementation of the change.

Your company can ensure the quality of any change made to the product through a mechanism for problem identification, change authorization, coordination and planning, cost and benefit analysis and record keeping. You can structure the work to perform the following:
- Implement a change.
- Assess its impact on any managed business elements such as parts or documents.
- Notify lifecycle participants of proposed and approved changes.
- Track the progress and completion of work.
- Compare product configurations before and after the change.
2.3.5.1 User Interface
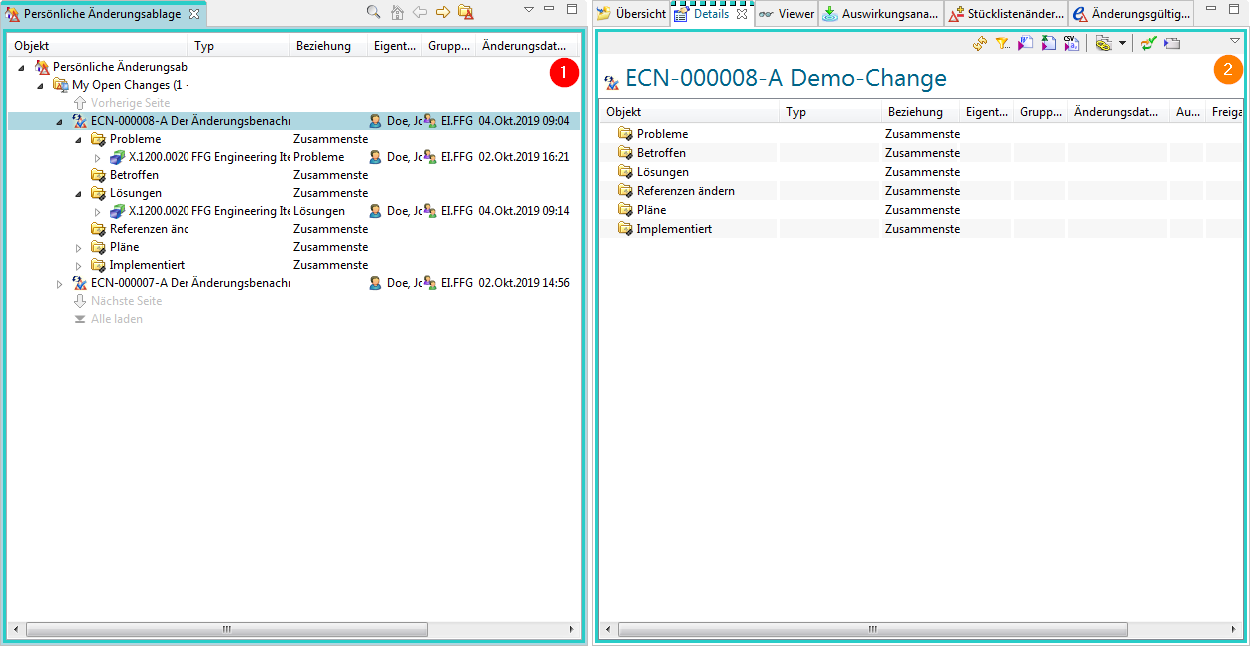
| 1. | The view Personal Change Repository contains saved searches for change objects defined by system administrators and users. The default search is My Open Changes. When you expand a change, the change folders and linked forms or other objects are displayed. |
| 2. | The perspective contains views for displaying change properties, linked items, BOM changes, change validity, and schedule line tasks. |
2.4. organization
2.4.1 Access Rights & Organization
- Persons
Real existing persons in the company with first and last name. One person can have more than one user.
⇒Max Mustermann
- User (User)
Is the identification of a user in the system. Users can belong to several groups.
⇒Max Dummy ⇒Administrator & User
- Groups
Correspond to summaries of users.
Group = Corresponds to a department or a project.
Groups can also be structured hierarchically (according to the company organization).
⇒Administrator ⇒dba, project administrators,…
- Roles
Activities of users in the organization (e.g. admin, employee, project manager, …) Different roles can be assigned to a user.
A role corresponds to certain rights that the user has.
Groups and roles can be used for:
- To manage access rights (read, write, delete) per group and role
- Definition of control/approval instances (for workflows) based on groups and roles
- Organization of the data according to the group you have created.

2.5. Items & Revisions
2.5.1 Basic Items & Revisions
An item (element) in Teamcenter is a structure of a connected object. The basic structure of each item consists of the following objects:
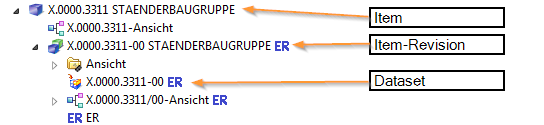
| Item | Gathers data that is generally applicable to all revisions of the item. |
| Item Revision | Collects data applicable to a single revision of an item. |
| Dataset | The dataset forms the direct link to the data set on the Vault. |
2.5.2 Properties of an item
- Items are basic objects that are used to manage information
- They represent physical or conceptual entities that enable audits and information changes.
- Imagine an item as the top level, which contains all information about a specific object or product.
- The item ID is composed as follows - here in the example for the European MAG locations - X.0000.0000
- No two items may have the same item ID. An item ID is always unique!
- An item provides access to all the information needed to design a part, including all changes, together.
- When creating an item, Teamcenter also automatically creates an Item Master Form
2.5.3 Properties of an item Revision
- Item revisions manage the changes to an item and save the changes within the item.
- When you create an item, Teamcenter automatically creates the item revision.
- There must be at least one item revision for each item.
- Item revisions are the items that receive a release status
- Contains the SAP master form - here the link between the SAP material number and the item in Teamcenter is linked.
- Contains one or more datasets
2.6. Datasets
2.6.1 Dataset Objects
Files which are started from Teamcenter with non Teamcenter applications (e.g.: NX, Word, Excel, …) are managed by Teamcenter ⇒ Dataset Objects.
Here are some examples:
| Symbol | Type | File | Application |
 | Text | .txt | Text Document |
 | MS Word | .doc | MS Word document |
 | MS Excel | .xls | MS Excel spreadsheet |
 | Direct Model | .jt | 3D Visualization Model |
 | UGMASTER | .prt | NX Partfile |
 | UGPART | .prt | NX Partfile |
 | PDF/A | NX PDF document |
2.6.2 Importing a dataset
- You can insert datasets in Teamcenter under your item revisions.
- In case the datasets are not yet stored in Teamcenter, you can import the dataset.
- If you import the dataset under your Revision item, you must remember that the dataset is not found under the item but only under the Revision item.
- The revisions that are revised from this item revision also have the dataset reference in the item revisions.
- You can also create a completely new dataset directly in Teamcenter.
2.7. relations
2.6.1 Relation types
- Much information describes an item or is linked to the item, revision
- Teamcenter uses relations to define the relationship between data objects and items / revisions.
Automatically defined relation types:
2.6.2 User defined relation types
(e.g. when copying / inserting objects into an item / revision)
- Specification Relation. Documents of an audit. Are checked and blocked during a release (e.g. 3D masters, drawings, NC programs, …)
- Requirement Relation
Contain criteria that must be met by the design, but do not define how the design is to be executed. (e.g. specifications)
- Altreps
(alternative representation) - Alternative description of the component (e.g. spring tensioned / not tensioned. As this is only a state description, it will not appear in parts lists parallel to the part.
- Manifestation Relations
Relationship of documents with explanatory character only. These have no meaning in the sense of a relevant or legal product description (e.g. internal presentations, films, photos…)
- Reference Relation
General, undefined relationships between data objects and items / revisions.
(e.g.: field reports, technical articles, laboratory reports notes…)
Solid Edge
1. Solid Edge 2023 Update
Teamcenter Documentation
1. Overview
2. Teamcenter Basics
3. Working in Teamcenter
4. Working with CAD applications
5. Working with the structure manager
6. Workflows in Teamcenter
EPLAN - integrate2
1. Preamble
2. Function Description
3. Operating the Integration
4. Troubleshooting